Two-Step Authentication for RDP on Windows Servers
Below are instructions for adding Duo two-step authentication to RDP on a Windows server that uses SUNet login credentials.
- Before you install Duo, create a backup of the server (strongly recommended).
- Obtain your API keys (integration key and secret key) and Duo API hostname, which you need to integrate with the Stanford University Duo installation. You can either generate the keys and hostname yourself or submit a request for them.
- Log in to a Unix machine. To access a Unix machine via a Windows server, use SecureCRT to connect to the cardinal machines through the Stanford University Shared Computing Environment.
- Authenticate yourself via Kerberos (i.e., kinit) if you have not already done so.
- Install wallet if you have not already done so. For instructions, see Keytabs and Wallet.
- Run the following command, where "yourcomputer.stanford.edu" is replaced with the fully-qualified domain name of the node:
wallet get duo-rdp yourcomputer.stanford.edu
[duo]
ikey = aq1sw2de3fr4gt5hy6ju7ki8lo9
skey = 1qaz2wsx3edc4rfv5tgb6yhn7ujm8ik
host = api-123456789.duosecurity.com
- Download the “Duo Authentication for Windows Logon Installer Package” from the Duo website at duo.com/docs/rdp. Relevant installation instructions for Windows systems are excerpted below.
- Run the Duo Authentication for Windows Logon installer with administrative privileges. Accept the license agreement and enter your integration key, secret key, and Duo API hostname when prompted. Enter the following information in the Duo Security Account Details screen:
- Bypass Duo authentication when offline (FailOpen): check this option to allow user logon without completing two-factor authentication if the Duo Security cloud service is unreachable.
- Use auto push to authenticate if available: check this option to automatically send a Duo Push or phone call authentication request after primary credential validation.
- Only prompt for Duo authentication when logging in via RDP: leave this option unchecked to require Duo two-factor authentication for console and RDP sessions. If enabled, console logons do not require two-factor authentication approval.
- Enable Smart card support: optional — this option permits use of the Windows smart card login provider as an alternative to Duo authentication.

- To test your setup, attempt to log into your newly configured system as a user enrolled in Duo.
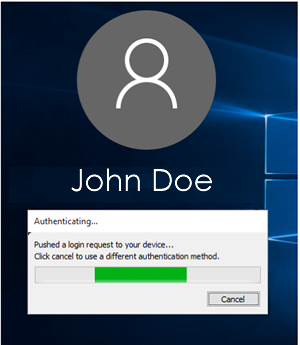
- The Duo authentication prompt appears after you successfully submit your Windows credentials.
- When auto-push is enabled (the default option), the Duo prompt indicates that a request has been pushed to your phone.
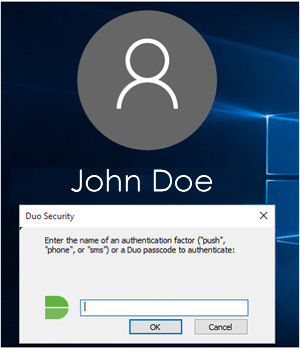
- If auto-push is disabled or if you click Cancel on the Duo authentication prompt, you can enter the name of any available factor (like “sms” to receive a passcode via text message) to verify your identity to Duo.
- When auto-push is enabled (the default option), the Duo prompt indicates that a request has been pushed to your phone.
- The following table shows the names of authentication factors you can enter for the Duo prompt:
Passcode (e.g., 123456) Log in using a passcode, either generated by your hardware token or sent via SMS. “push” Perform Duo Push authentication. You can use Duo Push if you’ve installed and activated the Duo Mobile app on your device. “push” Perform phone callback authentication. “sms” Send a new SMS passcode. Your first authentication attempt is denied. You can then authenticate with one of the newly-delivered passcodes. - You can also specify a number after the factor name if you have more than one device enrolled in Duo, like “phone2” to call your second phone or “push2” to send the request to Duo Mobile on your second phone.
- Remember: if you find that Duo Authentication for Windows Logon has locked you out of your Windows system (e.g., due to a configuration error), you can reboot into Safe Mode to bypass it.
For more information or help, please submit a Help request.
Last modified