What's New for Mobile Device Ordering
University IT (UIT) has transitioned the ordering for Mobile Devices from OrderIT to ServiceNow, the tool that currently powers the Stanford IT Services & Support portal. This enhancement is part of a multi-year project to streamline the ordering process for all University IT services.
The following information will help guide Departmental IT contacts, STARS and Admins through the new experience.
Before you begin: Authority required
You must have the “Request Approver” or “Request Viewer” Authority role to view and place orders using the mobile ordering forms in the Mobile Devices Service Catalog.
You can review your authority roles via the following steps:
- Open Authority Manager and select My Authority.
- Locate the Service Management Systems section and verify you have the “Request Approver” or “Request Viewer” Authority role for the UIT Billable Service Privilege.


If you do not see the “Request Approver” role, or the “Request Viewer” role, for UIT Billable Service Approver or Viewer you do not have the Authority to view and place mobile device orders. To request new or additional access visit the How to Request Authority web page.
Add Mobile Device service
Select the organization the service will be affiliated with below and follow the steps to add the mobile device service.
Stanford University
 Visit How to Order, Change or Cancel Mobile Device Service.
- Under the Departmental IT section, click the Add mobile device service button.
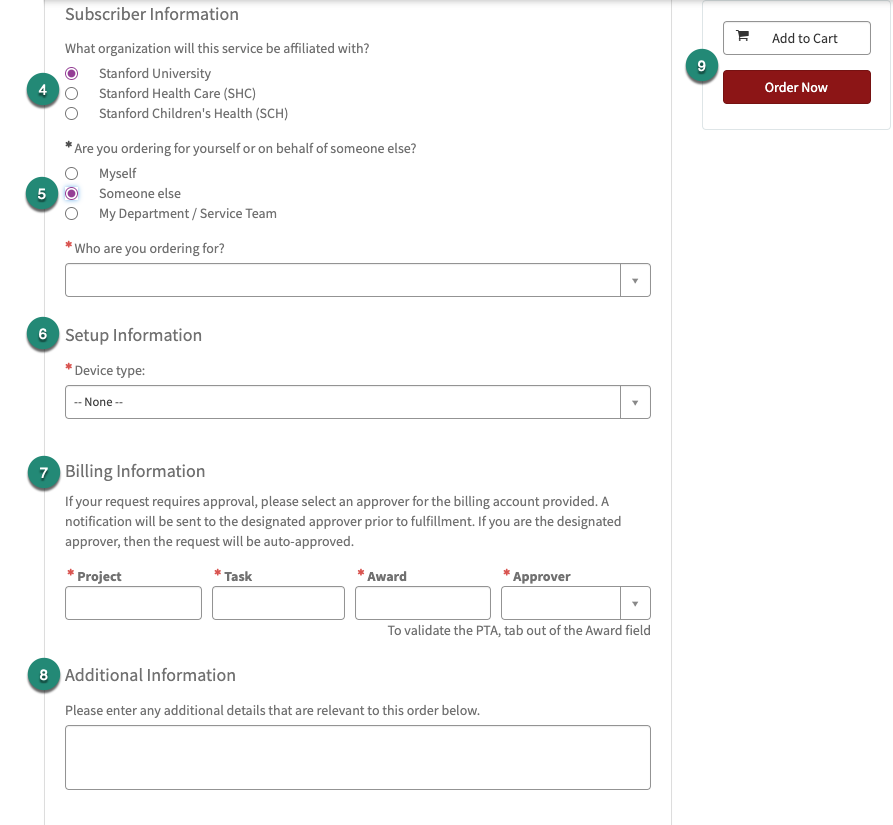
- Log in with your SUNet ID and password (if prompted) and fill out the form, starting with the top section and working down. Items marked with a red * are required.
- Select the organization the service will be affiliated with.
- Indicate who the order is for:
- Myself
- Someone else (Enter name, email, or SUNet ID)
- My Department/Service Team (Enter the name of the Department/Service Team)
- Select the Device type (Cell Phone, Hotspot, or Tablet).
*additional required fields need to be completed based on your device selection.
Note: The Device type list filters by your most recent selection.
Tip: dial *#06# on any phone, and a message will pop up with the IMEI number. - Enter the Billing Information (Project, Task, Award and Approver).
- The Approver field will default to the submitter’s name if you are a Request Approver for PTA, but can be changed to a different Approver.
- No approval routing is required if the submitter is an approver.
- If the submitter is different from the name in the approver field, the request will go through the approval process.
- If you are ordering for yourself, you will need to indicate a different approver.
- Optionally, add additional information relevant to the order.
- Click Add to cart to save your order and Order Now when you are ready to submit the request.
Note: If you are unable to order, you may need to request new or additional access. See the How to Request Authority web page. You can review your current authority at My Authority.
Stanford Health Care (SHC)
- Visit the new Stanford Health Care (SHC) Mobile Ordering page.
- Click the Add Mobile Device Service button and log in with your SUNet ID and password (if prompted).
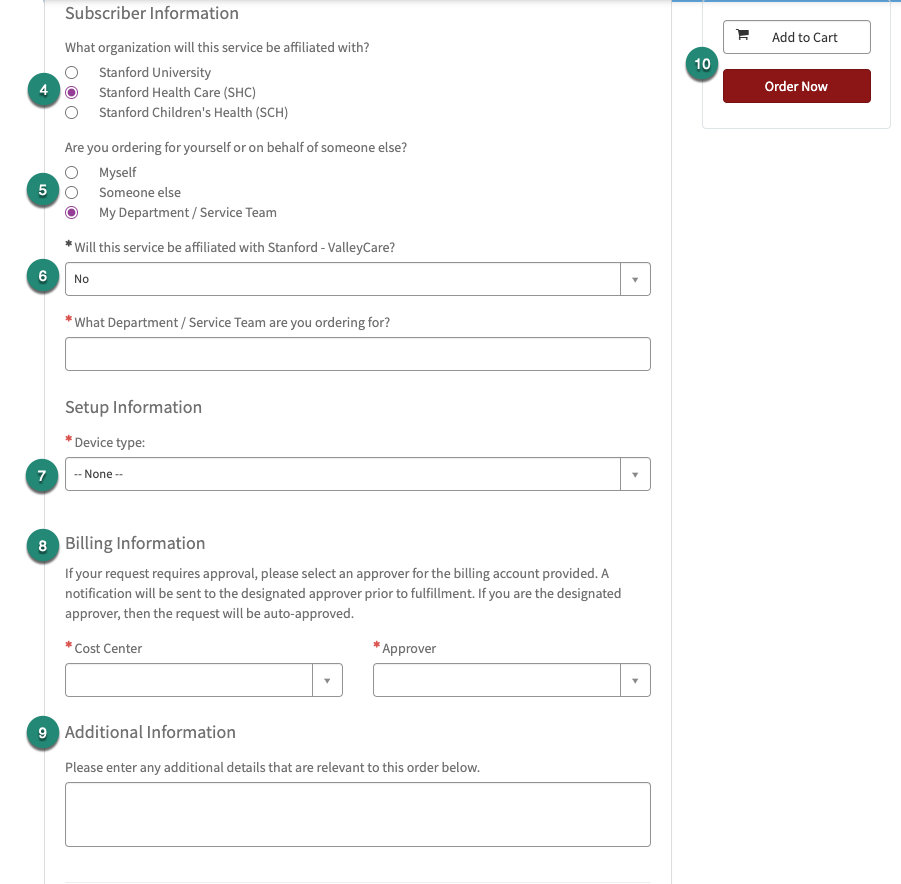
- Fill out the form, starting with the top section and working down. Items marked with a red * are required.
- Select the organization the service will be affiliated with.
- Indicate who the order is for:
- Myself
- Someone else (Enter first and last name, phone number, email, department, and SUNet ID (if applicable))
- My Department/Service Team (Enter the name of the Department/Service Team)
- Answer “Will this service be affiliated with Stanford - ValleyCare?” Yes or No.
- Select the Device type (Cell Phone, Hotspot, or Tablet).
*additional required fields need to be completed based on your device selection.
Note: The Device type list filters by your most recent selection.
Tip: dial *#06# on any phone, and a message will pop up with the IMEI number. - Enter the Billing Information (Cost Center and Approver).
- The Approver field will default to the submitter’s name if you are a Request Approver for cost center, but can be changed to a different Approver.
- No approval routing is required if the submitter is an approver.
- If the submitter is different from the name in the approver field, the request will go through the approval process.
- If you are ordering for yourself, you will need to indicate a different approver.
- Optionally, add additional information relevant to the order.
- Click Add to cart to save your order and Order Now when you are ready to submit the request.
Note: If you are unable to order, you may need to request new or additional access. See the How to Request Authority web page. You can review your current authority at My Authority.
Stanford Children's Health (SCH)
- Visit the new Stanford Children's Health (SCH) Mobile Ordering page.
- Click the Add Mobile Device Service button and log in with your SUNet ID and password (if prompted).
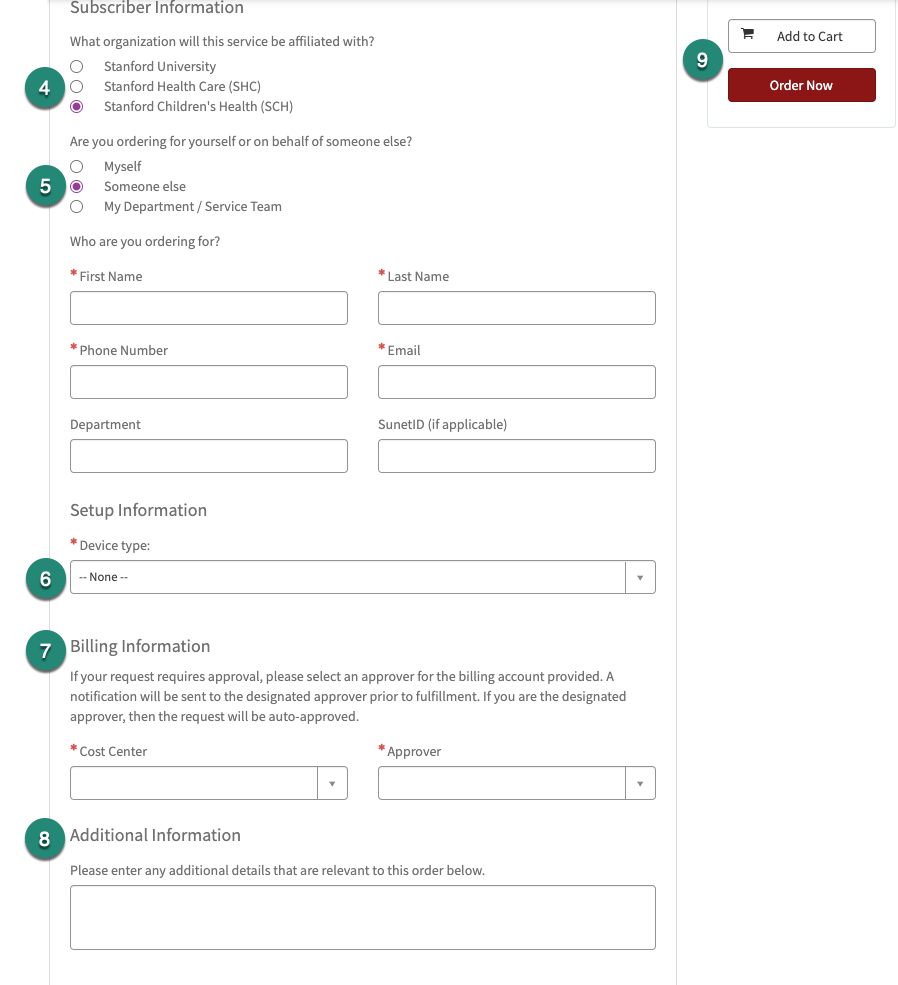 Fill out the form, starting with the top section and working down. Items marked with a red * are required.
- Select the organization the service will be affiliated with.
- Indicate who the order is for:
- Myself
- Someone else (Enter name, email, or SUNet ID)
- My Department/Service Team (Enter the name of the Department/Service Team)
- Select the Device type (Cell Phone, Hotspot, or Tablet).
*additional required fields need to be completed based on your device selection.
Note: The Device type list filters by your most recent selection.
Tip: dial *#06# on any phone, and a message will pop up with the IMEI number. - Enter the Billing Information (Cost Center and Approver).
- The Approver field will default to the submitter’s name if you are a Request Approver for cost center, but can be changed to a different Approver.
- No approval routing is required if the submitter is an approver.
- If the submitter is different from the name in the approver field, the request will go through the approval process.
- If you are ordering for yourself, you will need to indicate a different approver.
- Optionally, add additional information relevant to the order.
- Click Add to cart to save your order and Order Now when you are ready to submit the request.
Note: If you are unable to order, you may need to request new or additional access. See the How to Request Authority web page. You can review your current authority at My Authority.
Change or cancel Mobile Device service
- Visit How to Order, Change or Cancel Mobile Device Service.
- Under the Departmental IT section, click the Change or cancel mobile device service button.
- Log in with your SUNet ID and password (if prompted).
- Enter the 10-digit mobile phone number for the account you are requesting to change or cancel.
- Select from the options to change or cancel the service.
- I would like to make a CHANGE to this service.
- I would like to CANCEL this service.
*additional required fields need to be completed based on your selection.
- Optionally, check the Alternate Contact checkbox to Add or change the alternate contact for this service.
- Click the Submit button when you are ready to submit the request.
*If the submitter is not the approver it will go through an approval process.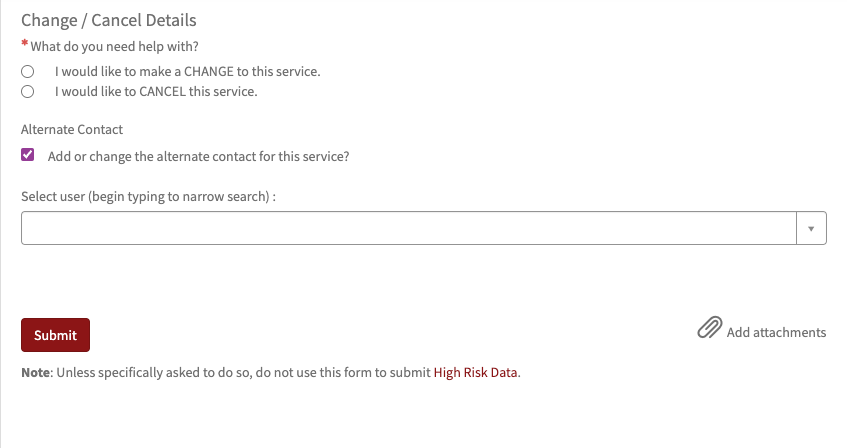
Review the Status of Your Submission(s)
- Visit the Stanford IT Services & Support portal
- Log in with your SUNet ID and password (if prompted).
- Click My Tickets to see a list of your open tickets and the option to view all tickets.
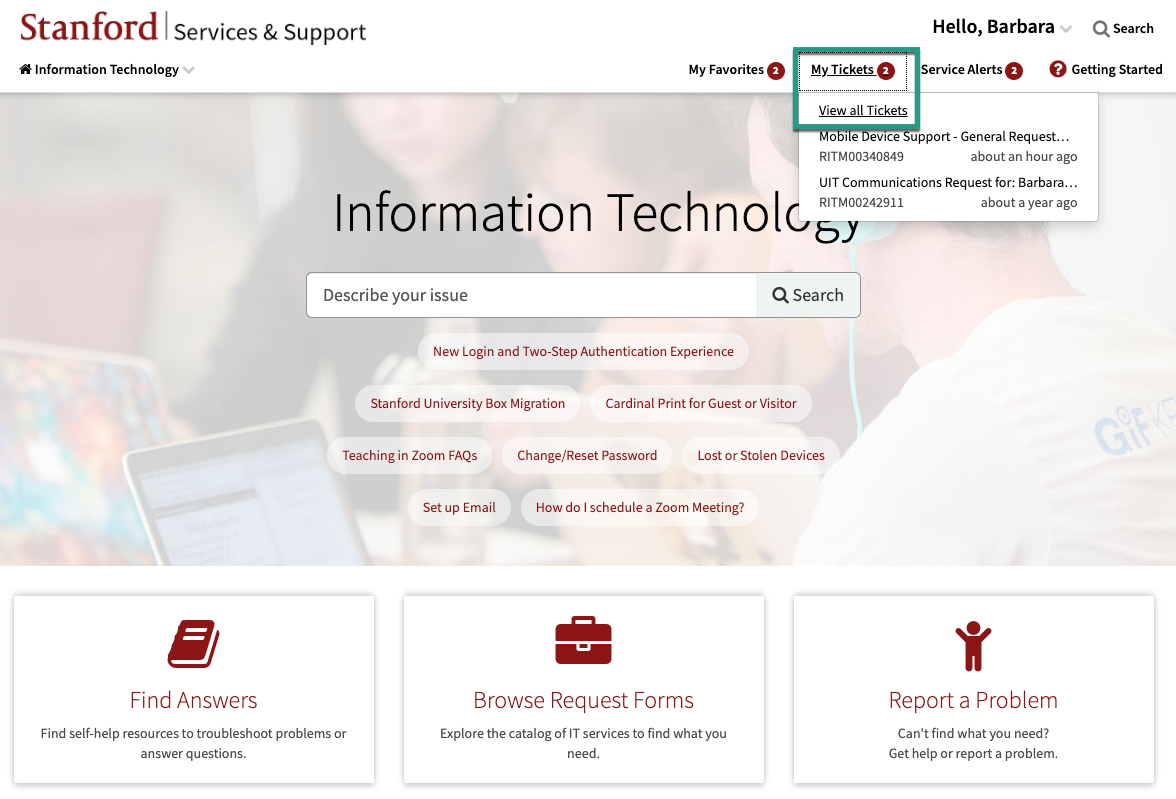
- Click view all tickets to see all of your open and closed tickets.
- Under the Open Tickets tab, you can review the details of open tickets that were updated within the last 30 days.
- If you don’t see the ticket you are looking for, select a different date range using the drop-down.

- If you don’t see the ticket you are looking for, select a different date range using the drop-down.
- Click the Closed Tickets tab to review the details of closed tickets that were updated within the last 30 days.
- If you don’t see the ticket you are looking for, select a different date range using the drop-down.
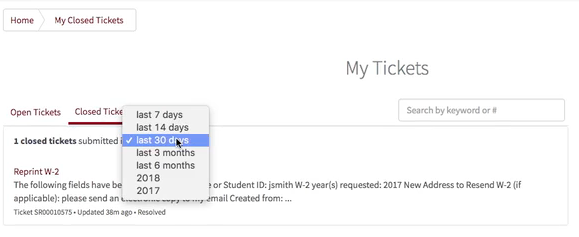
- If you don’t see the ticket you are looking for, select a different date range using the drop-down.
- Under the Open Tickets tab, you can review the details of open tickets that were updated within the last 30 days.
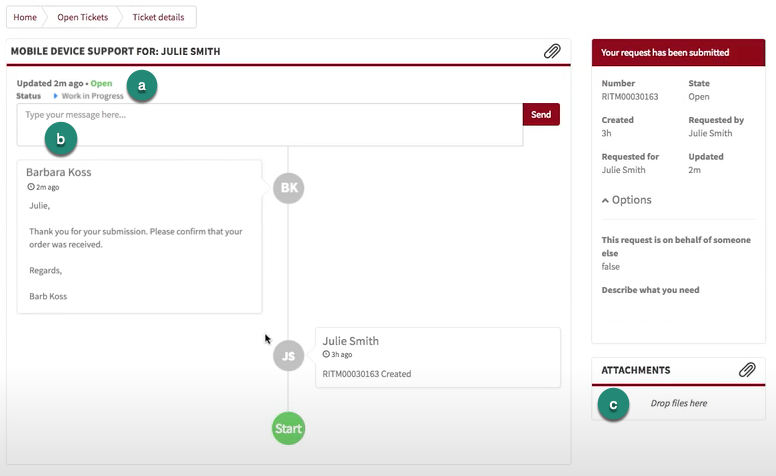
- Click directly on a ticket to see the detailed status of that ticket.
- Review the status of your request.
- In the message box, you can correspond with a support representative who is working on your ticket or send additional details about your request.
- Drop any necessary files in the Attachments section and they will upload directly to your request ticket.
