Jamf Site Admin Onboarding Exercises
❗️Important: if you are unable to enroll in Jamf Cloud Test Drive (sutestdrive.jamfcloud.com) due to your test device's ADE enrollment not allowing removal of the MDM Profile, submit a ticket requesting the following:
"I am unable to enroll in Stanford's Jamf Cloud Test Drive instance (sutestdrive.jamfcloud.com), because my test device is ADE-enrolled in Stanford's Jamf Cloud Production instance (stanford.jamfcloud.com). Temporarily remove device serial number X from ADE enrollment in stanford.jamfcloud.com to allow for enrollment in sutestdrive.jamfcloud.com. This is specifically to onboard me as a Jamf Site Admin for my department’s Jamf-managed devices."
As you complete these exercises, keep in mind:
-
Where you see references to "YourSUNetID," enter your own SUNet ID in place of that text.
-
If you see brackets -- i.e. [] -- surrounding text, use that exact bracket placement convention.
-
Use the following log file to monitor progress of any policies you scope to your test computer(s).
/private/var/log/jamf.log
-
Getting stuck? Ask a colleague or poke us in the #jamf channel; this is an open book training to complete just as you would approach your day-to-day work.
Upon successful completion of the steps, Jamf will automatically detect and notify you of that completion. We will then inform you via ServiceNow when your Jamf Site Admin access has been provisioned.
Important Notice For Distributed IT staff seeking Jamf Site Admin access:
It is important to complete the following exercises in sequence.
The related training module should have directed you here, which implies you should have already enrolled a test computer in our Jamf Cloud Test Drive instance:
Stanford Jamf Administration - Test Drive:
https://sutestdrive.jamfcloud.com
💡Tips found in most exercises are valuable nuggets of information. Some are cautionary warnings; we all learn from mistakes, but it's best that we spare you from some common ones.
- Exercise 1: Create a Smart Group for End User Computers
-
Create a Computer smart group identifying End User computers by serial number. This will represent your hypothetical fleet of Site computers; but in actual practice, you would simply target "all computers."
- Name: [YourSUNetID] All End User Computers for YourSUNetID
- Select the criterion: Serial Number
- Specify criterion value: Serial Number of enrolled test computer(s)
💡 Tip:
Alternatively, you can create a Static Group and select computer members by enabling the checkbox next to each record. However, it is unknown when Jamf will release a Jamf Pro version to fix long delays displaying the list of computers for selection, so avoid use of static groups, if you experience these delays.
⚠️ CAUTION ⚠️
When using the Serial Number criterion more than once in your smart group criteria, you must use the OR logical operator.
When unsure of a change and its effects, first "stage" the new criteria in an Advanced Search, validate the results match your expectations, then make the corresponding changes to your existing smart group.
- Exercise 2: Create a script deployment policy to rename computers
-
Create a policy to deploy an existing script to rename computers to their respective serial number, including a hyphenated prefix identifying your department.
- Name the policy: [YourSUNetID] Rename Computer for End Users
- Trigger the policy upon: Recurring Check-in
- Optional: include a Custom Trigger like renameCompPrefixEndUser, so you can immediately trigger the policy, instead of waiting out the 15-minute check-in period
- Give the policy an Execution Frequency of: Once per Computer
- Add the script named “[SU] Rename Computer, Optional Prefix” via the Scripts payload
- For the prefix, enter your abbreviated department name as the script parameter (i.e. “DEPT” prefix should represent your department, like SOM, SMC, SLS,...)
- Include an Update Inventory in the Maintenance payload
- Scope your policy to Targets: [YourSUNetID] All End User Computers for YourSUNetID
💡 Tip:
Verify the policy has run on your machine via the jamf.log. You can also trigger it from Terminal with your Custom Trigger (e.g. sudo jamf policy -event renameCompPrefixEndUser)
- Exercise 3: Create a “Power Settings” Configuration Profile
-
Create a Power Settings Configuration Profile to configure ‘Energy Saver’ settings.
- Name: [YourSUNetID] Power Settings
- Make these settings selections:
- Desktop > Put the computer to sleep after: 3 hours
- Portable > Battery > Put the computer to sleep after: 1 hour
- Portable > Power Adapter > Put the computer to sleep after: 3 hours
- Apply the configuration profile at the: Computer Level
- Distribute the configuration profile using method: Install Automatically
- Scope your policy to Targets: [YourSUNetID] All End User Computers for YourSUNetID
💡 Tip:
It is fine to leave all other settings in this Energy Saver payload at their default. But be aware that a disabled checkbox implies disabling the corresponding setting upon profile installation.
- Exercise 4: Modify your "Power Settings" Configuration Profile
-
Change any setting in your previously created configuration profile.
- Document your change in the Profile Description
- Example Description:
Devices @ Stanford
Stanford SoE IT
Change History:
11/9/2022 - Set Energy Saver > Desktop > Put the display(s) to sleep after: 1 Hour
- Click Save
- In the Redistribution Options prompt that occurs immediately after clicking Save, note the second option to only distribute to newly assigned devices; select it, then click Save. (See screenshot)
💡 Tip:
It is important to know when to use which of the two Redistribution Options. Distribute to All implies removal and re-installation of configuration profile, so use this option with ⚠️CAUTION⚠️.

- Exercise 5: Enroll another test computer (or move on to the next Exercise, if you don't have a second test computer)
-
Enroll another test computer to act as an IT computer versus standard end user computer. If you don't have another test computer, we can target your existing test computer as the hypothetical "IT computer."
💡 Tip:
When you un-enroll a computer from Jamf (e.g. when un-enrolling from stanford.jamfcloud.com to then enroll in sutestdrive.jamfcloud.com), the CrowdStrike Falcon Sensor will almost certainly become un-responsive. Re-enroll in stanford.jamfcloud.com to allow Jamf to detect the problem and automatically repair your Sensor.
- Exercise 6: Create a Smart Group for IT Computers
-
Create a Computer smart group identifying IT computers by serial number.
- Name: [YourSUNetID] IT Computers
- Select the criterion: Serial Number
- Specify criterion value: Serial Number of enrolled “IT” Computer(s)
💡 Tip:
Alternatively, you can create a Static Group and select computer members by enabling the checkbox next to each record. However, you may have to avoid use of static groups, if you experience waiting several minutes for the list of devices to display for selection; this suggests Jamf has not yet released a Jamf Pro version and/or infrastructure change to address this performance issue.
⚠️ CAUTION ⚠️
Repeated for emphasis:
When using the Serial Number criterion more than once in your smart group criteria, you must use the OR logical operator.
When unsure of a change and its effects, first "stage" the new criteria in an Advanced Search, validate the results match your expectations, then make the corresponding changes to your existing smart group.
- Exercise 7: Create a second “Computer Rename” Script Policy for IT Computers
-
Create a policy to deploy the existing script to rename IT Computers with their serial number and a prefix of IT.
- Name: [SUNet] Rename Computer for IT
- Trigger the policy upon: Recurring Check-in
- Optional: include a Custom Trigger like renameCompPrefixIT, so you can immediately trigger the policy, instead of waiting out the 15-minute check-in period
- Give the policy an Execution Frequency of: Once per Computer
- Add the script named “[SU] Rename Computer, Optional Prefix” via the Scripts payload
- For the prefix value in Parameter 4, enter: IT
- Include an Update Inventory in the Maintenance payload
- Scope your policy to Targets: [YourSUNetID] IT Computers
- Click Save
💡 Tip:
In actual practice, you would first revisit your previous policy to exclude [YourSUNetID] IT Computers -- i.e. you would add your [YourSUNetID] IT Computers Computer Group to the [YourSUNetID] Rename Computer for End Users Policy's Scope > Exclusions.
- Exercise 8: Create an Application Deployment Policy
-
Create a policy to target IT computers with an automated Visual Studio Code installation.
- Name: [YourSUNetID] Install Visual Studio Code for IT
- Trigger the policy upon: Custom and enter a Custom Event like installVSCodeIT; this allows you to immediately trigger the policy with a Terminal command
- Give the policy an Execution Frequency of: Ongoing
- Add the Package name: Visual Studio Code - SU Test Drive
- Use the User Interaction tab to display a message at completion saying “Installation Complete - Visual Studio Code - SU Test Drive”
- Include an Update Inventory in the Maintenance payload
- Scope your policy to Targets: [YourSUNetID] IT Computers
- Add the script named “[SU] Policy End State” via the Scripts payload, with Parameter values of:
- sutestdrive-install-vscode
- success
- test
- Click Save
- Open the Terminal and enter the command sudo jamf policy -event installVSCodeIT (or whatever text string you entered as your custom event)
- Hit Enter, then look in /Applications for Visual Studio Code or refer to the jamf.log to confirm the policy successfully installed the package
💡 Tip:
In actual practice, you may want to avoid deploying an app to a computer that already has that application installed. See the Bonus exercise for an idea on how one might do that.
- Exercises Complete? Check Your Work, Check Your Computer, Check Your Logs
-
Do settings on your computer(s) confirm your policies and profile worked as expected?
If you have any trouble, see this log for clues: /private/var/log/jamf.log
Celebrate, if you’re done. If not, take a break, then come back to find what might be a simple oversight.
Again, if anything is unclear or you need help, just ask. This is not a test; you're not cheating by asking -- you're collaborating!
- Bonus Exercise: Create a Smart Group to exclude from your Visual Studio Code deployment policy
-
Create a Smart Group to identify computers with Visual Studio Code installed. Use this as an Exclusion group in your Visual Studio Code deployment policy.
- Name: [YourSUNetID] App Is Installed - Visual Studio Code
- Criterion: Application Title
- Value: Visual Studio Code.app
💡 Tip:
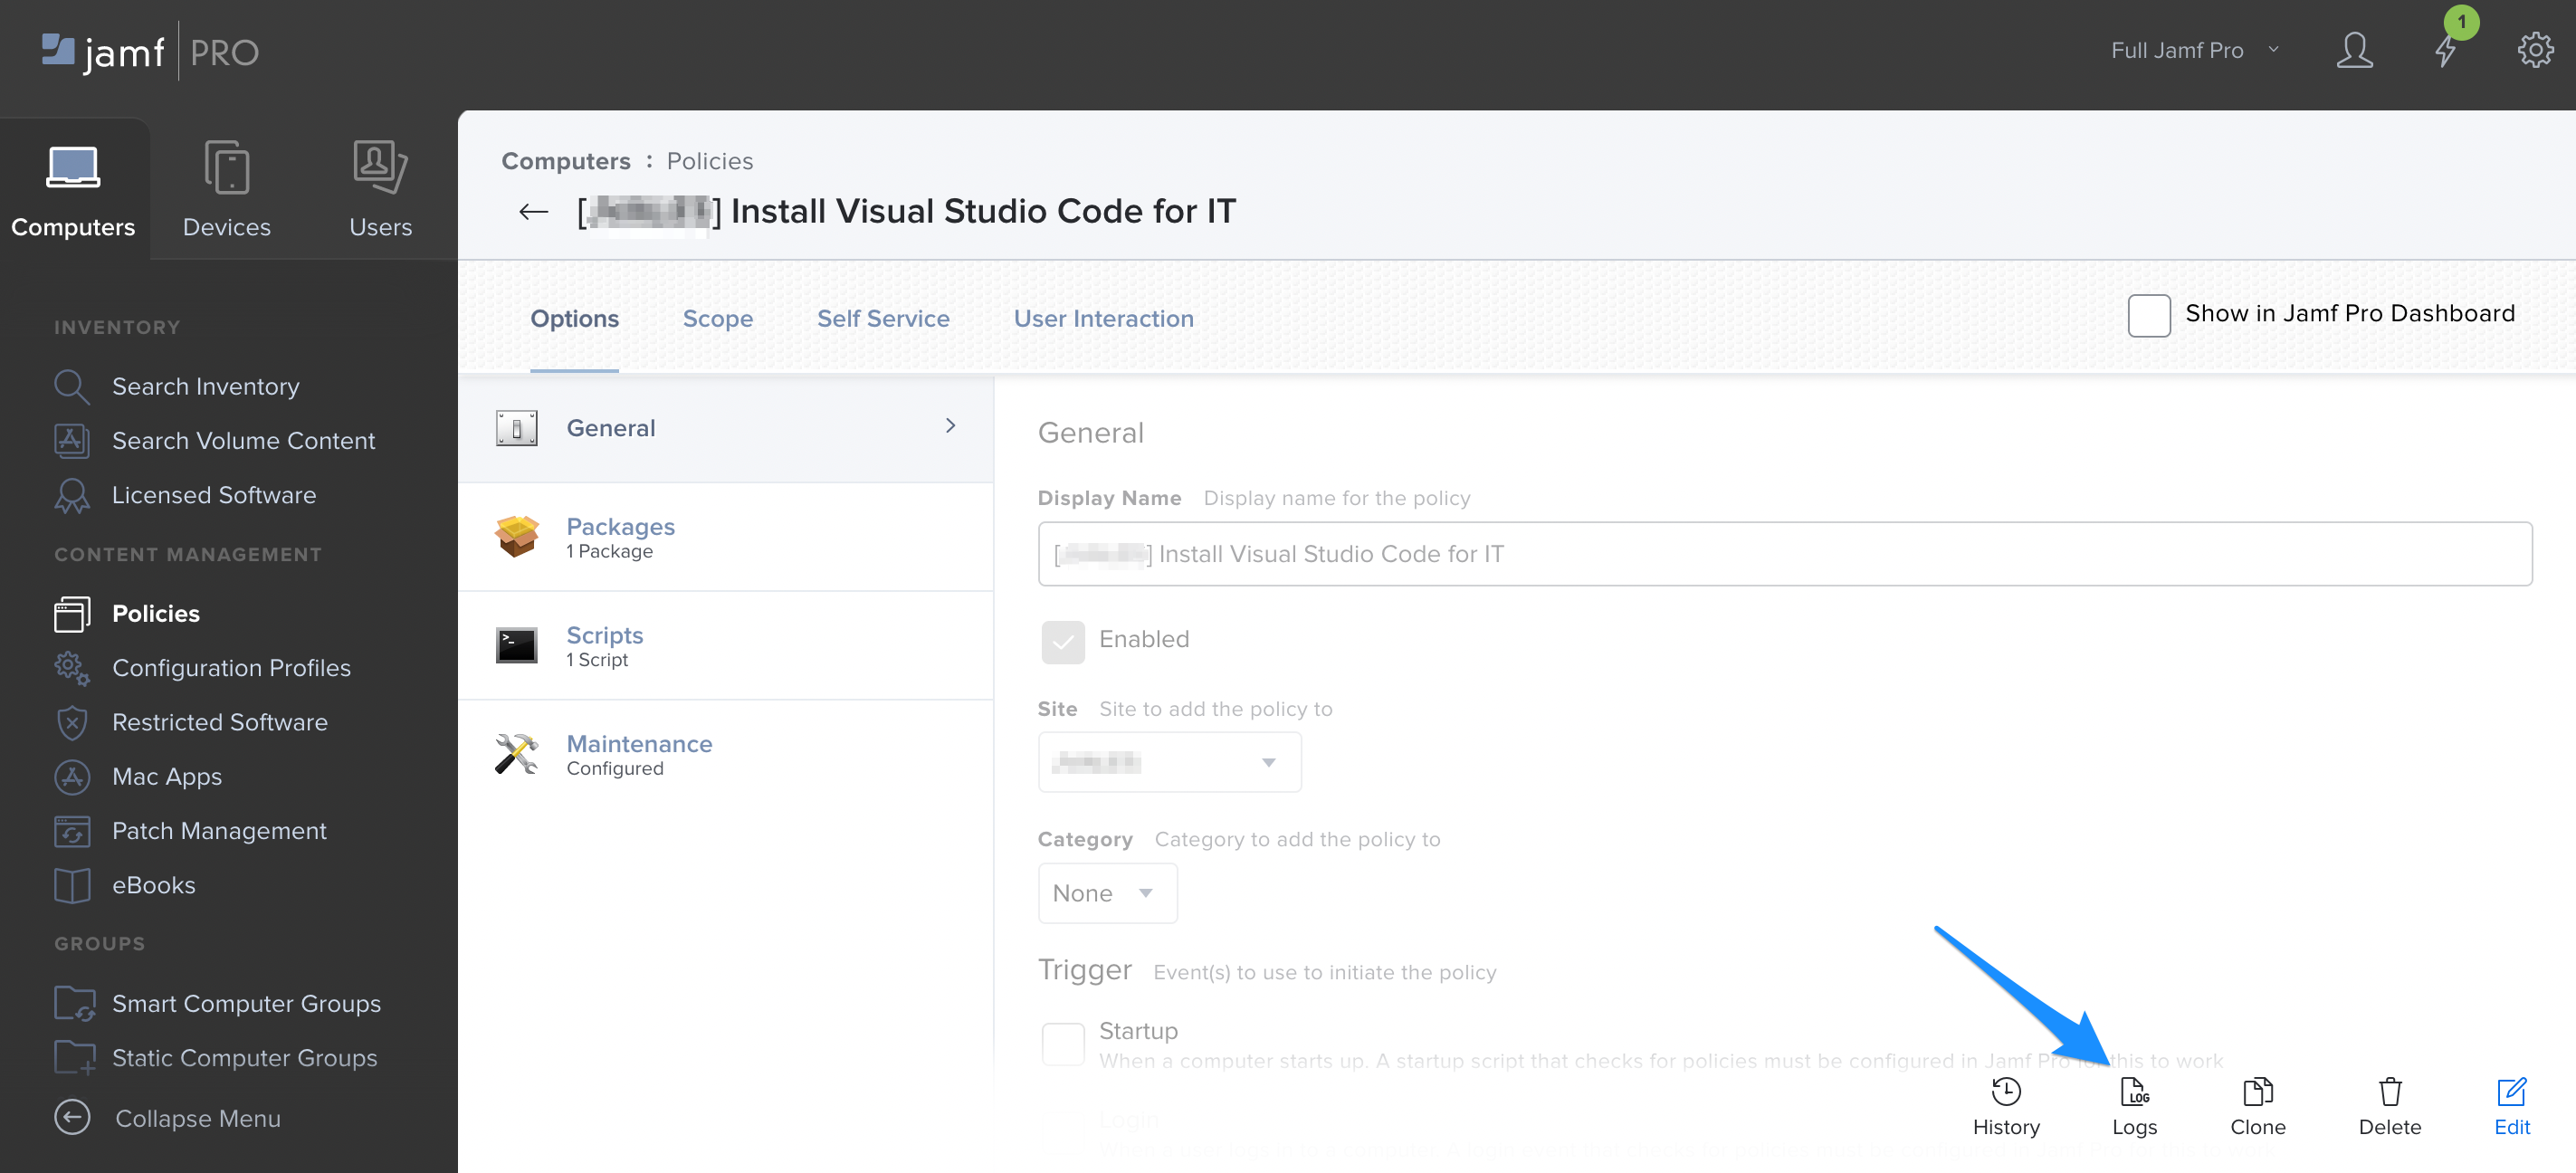
Looking at the jamf.log of each computer in your fleet is not practical.
How else might you check the status of your Policy deployments?
One way is to look at the Logs for your Policy as shown in the below screenshot.
🏁 Thank You for working your way through these exercises.
When you are ready to move this test device back to Stanford Production Jamf, simply wipe the device, allow Setup Assistant to ADE-enroll it, and authenticate to Stanford SSO as prompted. No ServiceNow ticket is required for this re-enrollment process.