Set Share Options for Shared Drives
Shared drive settings allow you as a manager to decide how team members share and collaborate on files within the shared drive. You can decide whether only people who are members of the drive or only those with a Stanford University Google account can access the files. You also manage who is allowed to download, print, copy, or share content
How to manage shared drive settings
- Right-click on the name of the Google Shared drive that you want to share and select Shared drive settings.

- In the Shared drives settings, select from the following share options:
- Access
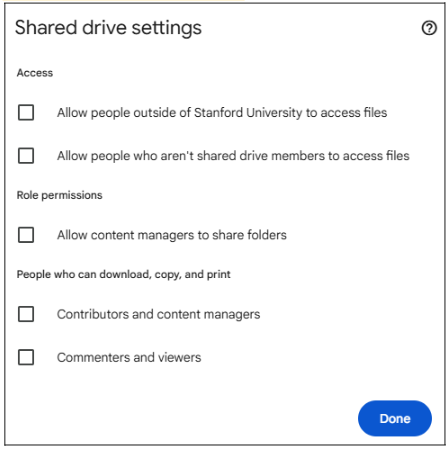
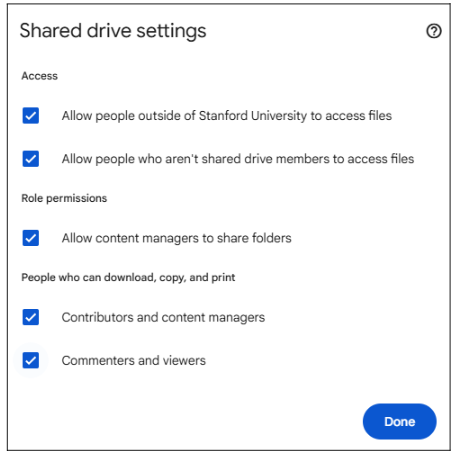
- Allow people outside of Stanford University to access files. If enabled, this option allows people outside of Stanford to access the files in addition to Stanford University members.
- Allow people who aren't shared drive members to access files. If enabled, members of the shared drive will have the option of sharing files with non-members. Learn how to share Google files securely.
- Role permissions
- Allow content managers to share folders. By default, a member with the Content Manager role can add, edit, move, delete, and share content. If enabled, this option will give content managers the additional ability to share folders.
- People who can download, copy, and print
- Allow contributors and content managers to download, print, and copy files. By default, members with a contributors and content managers role are restricted from downloading, printing, or copying files.
- Allow viewers and commenters to download, print, and copy files. By default, members with a Viewer and Commenter role are restricted from downloading, printing, or copying files. This limits their ability to disseminate the content. Learn about member permissions on files and folders
- Access
Image below shows the most restrictive settings:

Image below shows the least restrictive settings:

How to limit access to specific folders
As a manager, you can restrict access to certain folders for specific individuals.
This may be useful if you want to store some content but don’t want all members of the shared drive to have access. Members with general access will still be able to see the name of the restricted folder but won’t be able to open it. If someone doesn't have access to a folder, they can click Request Access to send an email to the owner.
Here’s what you should keep in mind:
- All shared drive managers can access folders with "limited access." You cannot remove a shared drive Manager's access to a folder.
- Managers can change the list of users with access to folders with limited access.
- If the option “Allow content managers to share folders” is turned on, Content Managers can manage limited access settings for subfolders they’re shared on in the drive.
- Everyone who inherited access to a subfolder but then had their access limited on it will appear under the new “Access removed” tab in the sharing dialog for the folder owner/shared drive Manager(s) of the subfolder.
- This feature is available at the folder level only.
How to create a limited access folder
- Select the folder you want to limit access to and go to Share.
- Select “Settings” (the cog wheel icon).
- Select the option to limit access to the folder.
- Click the Back arrow In the share dialogue, add or remove users.
Visit the Google Drive Help site for more on how to limit access to folders.
