Setting Permissions with Macintosh
Overview
Permissions determine who's allowed to see, change, or move your AFS files. The permissions you set don't work on the files themselves: they work on the folders that hold the files. On this page we show you how to add, remove, and edit permissions using Macintosh OS X computers.
The following example shows how to set permissions on a folder located inside your personal WWW folder.
- Get to your destination
- Are you allowed to set permissions?
- How to set permissions
- Commonly used permissions
- Setting pickier file permissions
- Setting group permissions
- Tips and tricks
- What each permission means
Note: You can also set folder permissions from the UNIX command line. First, make sure you are logged into Kerberos. Then, log into one of the shared UNIX workstations. See Setting Permissions with UNIX for more information.
Get to your destination
To get your AFS home folder, log into WebAFS. Inside your home folder are your WWW files and folders. Click the WWW folder to open it.
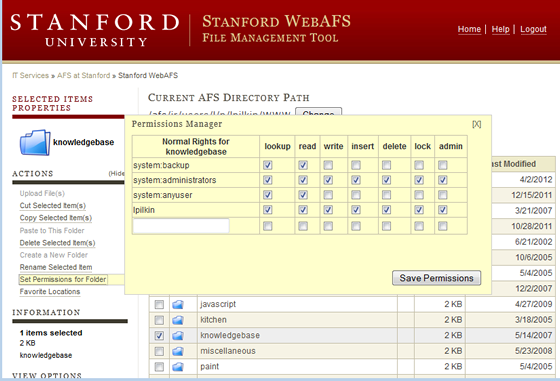
Check the box to the left the folder for which you want to set permissions and then under Actions click Set Permissions for Folder.
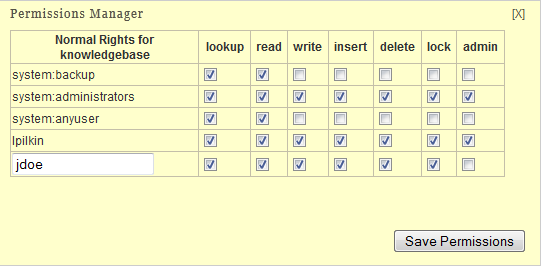
The Permissions Manager window will appear. In the "Normal Rights for folder name" section of this window you can see which permissions are currently controlling your folder.

Are you allowed to set permissions?
If you do not have the administrative privileges required to set permissions in this folder, the Set Permissions for Folder action is unavailable. The Are you allowed to set permissions page suggests ways to get administrative privileges. When you're in your own home folder you almost always have administrative privileges, but when you're not in your own home folder this issue is crucial.
How to set permissions
Note: The "Commonly used permissions" section, below, gives you more information about what these permissions are and what they do.
To add permissions
- In the Permissions Manager window, enter the SUNet ID of the person you want to add.
- Check the boxes for the permissions you want to grant to this person. For example, to grant "Write" permission, check the boxes for lookup, read, write, insert, delete, and lock.

- Click Save Permissions.
To remove permissions
- Locate the SUNet ID of the person you want to remove in the Permissions Manager window.
- Uncheck all the boxes associated with that SUNet ID.
- Click Save Permissions.
To edit permissions
- Locate the SUNet ID of the person whose permissions you want to change in the Permissions Manager window.
- Check or uncheck the permissions you want to grant this person.
- Click Save Permissions.
Commonly used permissions
This section tells you which permissions to assign based on what you want to do. These are the most commonly used permissions. You can set even pickier permissions if you need to.
- Look but don't touch (known as "Read" permissions) — Check the following boxes:
- lookup and read
- This lets people list your files, and open your files so they can read them, but prevents them from changing anything.
- Almost total power (known as "Write" permissions) — Check the following boxes:
- lookup, read, write, insert, delete, and lock
- This lets someone work in your folder, change files, delete them, add new files, etc., but prevents them from letting other people into your folder(s).
- Total power (known as "All" permissions) — Check the following boxes:
- lookup, read, write, insert, delete, lock, and administer
- Be stingy when granting these administrative permissions! The wrong person can wreak havoc in your folders.
- To lock someone out of a directory (this permission is called "None")
- Use the instructions (above) for removing permissions. This works even if the SUNet ID you remove had admin permissions. Note, however, that if this person is a member of a group permission they might still be able to influence your folder.
- If you're an instructor and are having many students submit tests, papers, homework, etc. into a single directory, you'll want to prevent the files they submit from being altered once they're added to the directory, and also prevent students from accidentally reading or deleting other students' work.
- Use the instructions above to:
- Add or edit an entity called: system:anyuser (It's not a SUNet ID, but works nevertheless.)
- Check the following boxes: lookup, insert, and lock.
- If you have to add "system:anyuser", don't forget to add that colon between the words "system" and "anyuser".
