How to Set Up Shared Email Using Apple Mail
These instructions will no longer work following Microsoft's requirement to use Modern Authentication. Please refer to our Shared Email instructions for Webmail and Outlook (Windows | Mac) as alternatives.
Outlook is the preferred desktop program for Shared Email. If you want to use Apple Mail, you'll need to configure it for IMAP. Prior to setting up your Shared Email account, you need a personal Exchange or IMAP account set up for your @stanford.edu email. Request access to IMAP by submitting a Help request.
Note: Apple Mail on OS X 10.9 and below does not appear to work with Shared Email. As an alternative, you can:
- Upgrade to OS X 10.10+ if you prefer to continue using Apple Mail for email.
- Use Microsoft Outlook.
- Use Webmail.
- Launch the Mail app. (Click the icon in the dock or go to the Applications folder to open it.)
- In the Mail menu, click Preferences.
- Click the Accounts in the toolbar and then click + (the plus sign) in the lower-left corner to add a new account.
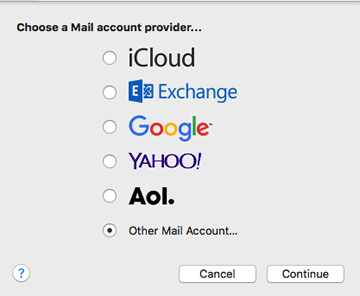
- When prompted to choose a Mail account provider, select Other Mail Account and then click Continue.
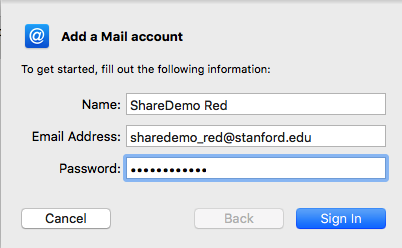
- Enter the following information and then click Sign In:
- Name: shared mailbox name
- Email address: shared mailbox @stanford.edu address
- Password: Stanford (or anything - use an incorrect password in order to access the full settings screen)
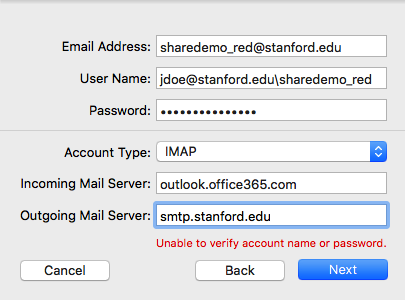
- In the next window, enter the following and then click Sign In:
- Email address: shared mailbox @stanford.edu address
- User Name: your sunetid@stanford.edu\shared mailbox
- Password: your SUNet ID password
- Account Type: IMAP
- Incoming Mail Server: outlook.office365.com
- Outgoing Mail Server: smtp.stanford.edu

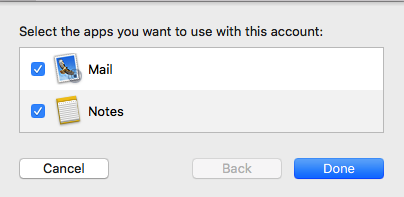
- The screen appears again with the same information. Click Next.
- Click Done.
- In the Accounts window, click your new IMAP account in the left pane. Click the Outgoing Mail Server (SMTP) arrow and then click Edit SMTP Server List.
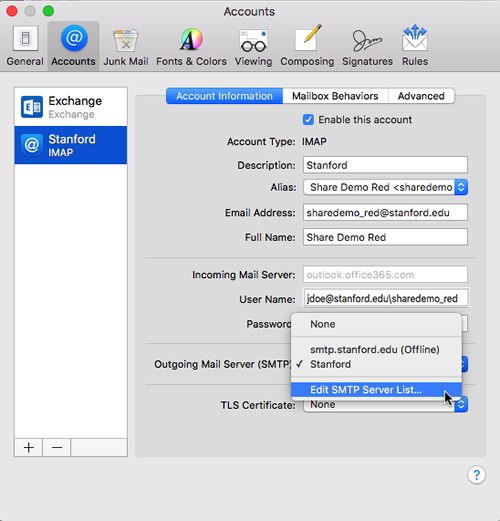
- When the list of outgoing servers displays, click the Advanced tab. Enter the following:
- Port: 465
- Use SSL: checked
- Authentication: Password
- User Name: your SUNet ID
- Password: your SUNet ID password
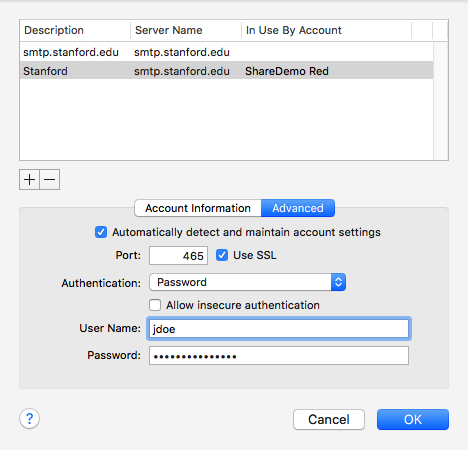
- Click OK to return to the IMAP Account Information window. Change the Description to the name of your shared email account.
- Click the Advanced tab and enter the following:
- Port: 993
- Use SSL: checked
- Authentication: Password
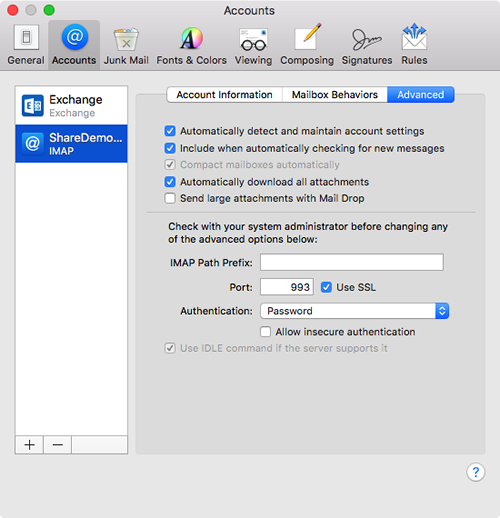
- Close the Accounts window and save your changes.
Last modified