WebAuth with Windows
WebAuth is being deprecated and will be retired soon.
To get help transitioning from WebAuth to SAML, visit SAML (Authentication) or the WebAuth Announcement page.
To WebAuth your web pages with a Windows computer you must first mount your WWW folder using Stanford OpenAFS and then set the appropriate permissions in your WWW folder. You then create a .htaccess (pronounced "dot HT-access") file using Notepad and place this .htaccess file into your WWW folder. It's actually quite simple. Notepad comes as part of Windows and Stanford OpenAFS is available free from the OpenAFS at Stanford web site.
Most people use WebAuth on pages contained in subfolders inside their WWW folder. This is because WebAuth actually works on the folder, not the page, so creating a subfolder is usually necessary (unless you want to protect your entire home page.) In the example below we assume you want to protect a web page inside a folder called "classproject", which is located inside your personal WWW folder. You can practice WebAuth by creating a new "classproject" folder in your WWW folder and following these instructions, or implement WebAuth as you go by using these instructions on a real folder.
Note: The Workgroup Manager is a web application that allows you to define groups of Stanford community members for use in various online applications (not just a web page or group of pages) that also uses web authentication (WebAuth). See the overview for Workgroups and the Workgroup Manager if this is the type of authentication you need.
Setting WebAuth permissions
Put your AFS home folder onto your desktop
- If you have Stanford Desktop Tools installed, right-click the
 icon in the lower right area of your screen and click Mount AFS Volume.
(Alternatively, you can click Start and navigate to Programs > Stanford > OpenAFS > Stanford AFS Controller. ) - When the Mount AFS Volume window opens, under "Mount volume belonging to," click My Home and then click Mount. If you need help doing this, see Using Stanford OpenAFS for Windows.
- Your home folder will open in Windows Explorer. Double-click the WWW folder to open it.
Set the appropriate permissions
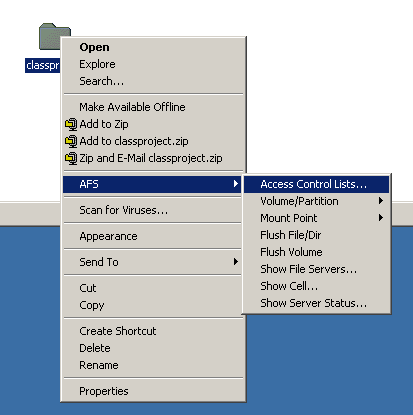
- Right click the "classproject" folder. A contextual menu for that folder will pop up.
- Slide your cursor down to AFS on the menu. Move the cursor to the right to open the submenu.
- Select Access Control Lists ....

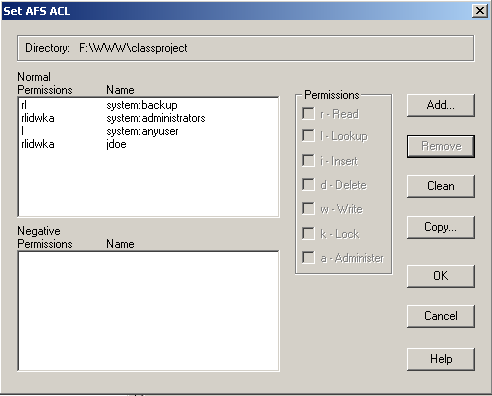
- A Set AFS ACL window will appear.This window shows what permissions are currently controlling your "classproject" folder. Basically, you need to remove " l system:anyuser" and then add or edit a permission that says " rl system:www-servers". This tells the web system how to restrict access to the "classproject" folder.

Remove "system:anyuser"
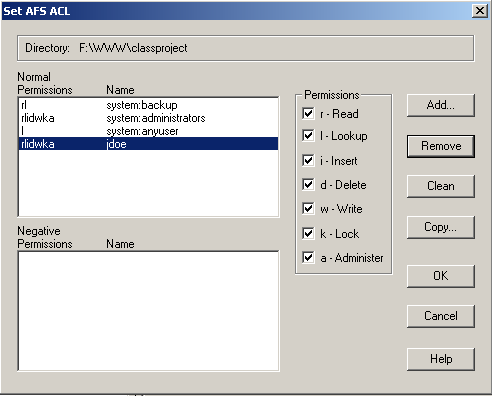
- Click on and highlight "system:anyuser" in the Set AFS ACL window.
- Click the Remove button.
Add "system:www-servers"
- Click the Add... button. An Add ACL Entry window will appear.

- In the Name: field, type:
system:www-servers
(Don't forget the colon (":"), without any spaces, between the word "system" and the word "www-servers".) - Click on the r - Read and l - Lookup buttons.
- Click OK.
To edit "system:www-servers"
In our example there is no "system:www-servers" ACL in the Set AFS ACL window. In real life, however, you may find this ACL present but with permissions different than the "rl" you need; you'll have to edit the ACL:
- Click on and highlight "system:www-servers" in the Set AFS ACL window.
- Click or unclick the "Permissions" buttons you want. (In our example, you'd click the r - Read and l - Lookup buttons, and if necessary unclick any other buttons.)
When you're done making changes in the Set AFS ACL window, click OK.
Create a .htaccess file
Open Notepad
- Click the Start menu.
- Click Run or press the Windows logo key + R.
- Type notepad in the dialog box.
- Click OK.
Or ...
- Click the Start menu.
- Click Programs.
- Click Accessories.
- Click Notepad.
Type the WebAuth instructions you want to use
- In the Notepad window you can type your two or three lines of WebAuth instructions. We recommend, however, that you simply cut and paste the WebAuth code you want from our list of ready-made WebAuth directives. This list provides you with the WebAuth instructions you need for the most often-used ways of protecting your web pages.
- If you do cut and paste from the list, your next step would be to edit the file. For example, if you copied and pasted this code from the WebAuth list:
- AuthType WebAuth
- require user sunetid1
- AuthType WebAuth
- require user gsmith
- Don't forget to include yourself as a person who can see your web page. In the example above, if your own SUNet ID was "jdoe" and you wanted to be able to see your own web page in addition allowing "gsmith" to see it, you would edit the code so it looked like this:
- AuthType WebAuth
- require user jdoe gsmith
- If you do cut and paste from the list, your next step would be to edit the file. For example, if you copied and pasted this code from the WebAuth list:
- Press RETURN once. The WebAuth instructions in your .htaccess file won't work unless they are followed by at least one carriage return.
Save the Notepad document
- Go to the File menu.
- Click Save.
- In the Save in field, save the file to your desktop or somewhere convenient on your hard drive.
- In the File name box, type .htaccess. (Don't forget the "." in front.)
- In the Save as type box, use: All Files.
- In the Encoding box, use: ANSI.
- Click Save.
- Close the Notepad document (which is your .htaccess file).
Put the .htaccess file into AFS
Your "classproject" folder should still be open and accessible via Stanford OpenAFS. You can place your new .htaccess file directly into AFS web space.
- Open the "classproject" folder.
- Drag the .htaccess file from your desktop and drop it into the "classproject" folder, or
- Copy the .htaccess file from whichever directory you've placed it on your hard drive into the "classproject" folder.
Test WebAuth to make sure everything works
- Have someone who should not have access to your web page try to see it on the web.
- If the .htaccess file works correctly, delete the copy that's still on your hard drive or keep it someplace where you can edit or use it again if necessary.
- If the .htaccess file does not seem to work you may need help figuring out what's wrong. Please send a HelpSU request and describe the situation.
