Four ‘Not-So-Obvious’ Tips to Use Google Forms Like a Pro
Form Builder may now be gone, but Google Forms can get the job done for you. If you’re new to this web forms tool, you may just need to jump in to get familiar. Google provides great documentation on getting started. Here are a couple of resources that I’ve revisited:
So, when you’re ready to level up your Forms game, read on for a few not-so-obvious pro tips that I’ve picked up in my journey to adoption.
1. Make your Google Form Stanford-only
Google gives us the ability to restrict our forms to a Stanford-only audience. This means that if you need to collect information from a Stanford-specific audience, you can require that only those logged in with a SUNet ID will be able to view and respond to your form.
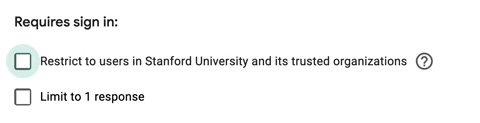
Follow these instructions on how to make your form accessible to Stanford-only respondents.
Remember that on the other side of this, you can control who has access to the information that is submitted through Forms. Just as with Google Docs, Sheets, and Slides, you can add collaborators and manage viewing and editing permissions.
2. Pause or stop accepting form responses
With Form Builder, you could publish your form when it was go-time, and unpublish to shut it down. Once unpublished, any user that clicks an inactive form link would receive a 404 error message.
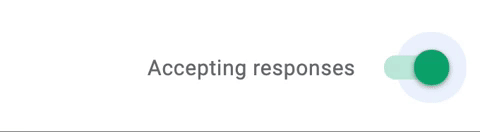
With Google Forms, you won’t necessarily be publishing or unpublishing the form. Instead, you can toggle between “Accepting responses” and “Not accepting responses.” This is essentially an on/off switch for your form. Look for it directly under the Responses tab at the top of your form.
My favorite part: You can write a message to those who try to access an inactive form. This means you can give direction to the respondent. Let them know that they can reach out to a point of contact (e.g., name and email address), visit a webpage, or that the form is not yet open for responses.
If you don’t enter a message, Google will use the default message: “This form [title of form] is no longer accepting responses. Try contacting the owner of the form if you think this is a mistake.”
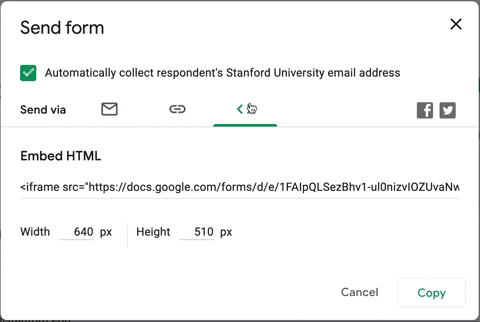
3. Embed your Google Form into a webpage
Let’s say you have a webpage for a class, program, or event, and you need to collect information from visitors to that page. Embed a Google Form into your webpage and your page instantly becomes interactive!
Here’s one example of how my team uses the Forms embed. For our UIT leadership ask-me-anything meetings, we update a webpage with all of the event information. Additionally, we embed a Google Form with a single field that allows people to submit questions or discussion topics ahead of the event. Pretty simple, right?
One important thing to note is that embedded restricted forms will not always show on a web page. This is because Stanford users must be already logged into accounts.google.com with their stanford.edu address to be able to access Stanford-only forms. (See these tips about switching between Stanford and personal Google accounts.)
To address this limitation, consider these solutions:
- Don’t restrict embedded forms to Stanford-only but instead, restrict the webpage itself. The caveat is that the forms won’t automatically capture Stanford addresses of respondents.
- Alternatively, keep forms restricted and link directly to forms instead.
So, when you do want to use the embed feature, you can grab the embed code directly from your Google Form. Follow these instructions on how.
Are you building out a website on Stanford Sites Drupal 8? The process for embedding a Google Form is even simpler. Check out these instructions.
4. Set up Advanced Form Notifications
The final feature I want to call out requires a few additional steps to set up, but you may it find worth your while! If you’ve ever explored Google Add-ons, you might already know that they are third-party plugins that enhance the features and functionalities of Google Apps.
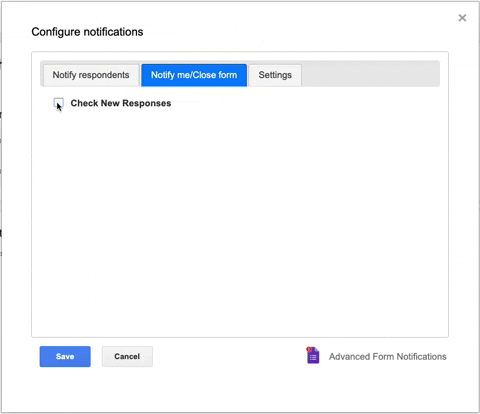
With the Advanced Form Notifications Add-on, you can customize email notifications to form respondents and collaborators. This far expands the limitations of the response notification options that are already built into the Google Forms tool.
In addition to sending custom email messages to respondents, you can manage the timing for when you, the form owner and/or other collaborators, get notified about new responses, and set a cap on how many responses can be submitted.
For example, you can set form notifications to send to you after 10 — or whatever number you choose — responses are submitted. Then, after submissions hit the number you’ve selected — or alternatively, an established date and time — you can set the form to shut down any additional incoming responses. You have much more control over when and how your email inbox might be barraged with new mail. How does that sound?
If you’re ready to give it a shot, follow these instructions for how to install and set up the Advanced Form Notifications.
Learn more
- Visit our Google Forms service page for more resources.
- Browse our FAQ that addresses common questions about transitioning off Form Builder and accomplishing Stanford-specific tasks using other web forms tools.
What to read next:

Navigation Updates for Zoom Web Portal Coming Soon