Jira Cloud Frequently Asked Questions
This FAQ provides information for the migration of Jira from on-premise servers to the cloud.
On this page:
Access
- Q: How do I log into the Cloud?
-
A: The initial login screen will look different when accessing the Cloud, but you will still login using your Stanford email address and SSO, as you do today.
Beginning May 22, 2023, use the following steps to log in:
- Visit the new Jira homepage in the Cloud.
Note: If you are part of the User Acceptance Testing (UAT) for Jira Cloud, use this Jira link and the steps below to access. - Enter your <SUNetID>@stanford.edu in the email field. Email aliases will not work.
- Click the blue Continue button.
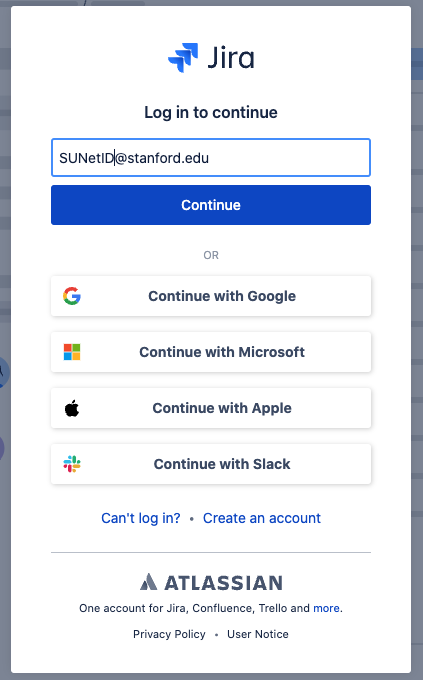
- Enter your SUNet ID and Password (If prompted) and click Login.
- Complete Two-Step Authentication.
- Visit the new Jira homepage in the Cloud.
- Q: Can we access Jira Cloud using the same hyperlinks?
-
A: No. The hyperlinks are different when accessing Jira Cloud. Review the table below for a comparison.
Old Jira URLs New Jira URLs Homepage https://asjira.stanford.edu/jira/secure/Dashboard.jspa https://stanford.atlassian.net/jira/your-work Project - [https://asjira.stanford.edu/jira/plugins/servlet/project-config/ATLCLOUD/summary
(If we search for project from settings tab projects it will redirect to summary page) - https://asjira.stanford.edu/jira/projects/ATLCLOUD/issues/ATLCLOUD-215?filter=allopenissues
(If we search for project from top projects dropdown it will redirect to allopenissues page)
- https://stanford.atlassian.net/jira/software/c/projects/ATLCLOUD/boards/6109
(If we search for project from settings tab projects it will redirect to active sprints page) - https://stanford.atlassian.net/jira/software/c/projects/ATLCLOUD/boards/6109 (If we search for project from top projects dropdown it will redirect to active sprints page)
Issue Mapping - [https://asjira.stanford.edu/jira/plugins/servlet/project-config/ATLCLOUD/summary
- Q: Can I still access the legacy on-premise Jira?
-
A: The legacy on-premise Jira URL ( https://asjira.stanford.edu) will be accessible in a read-only mode through Sept. 30, 2023.
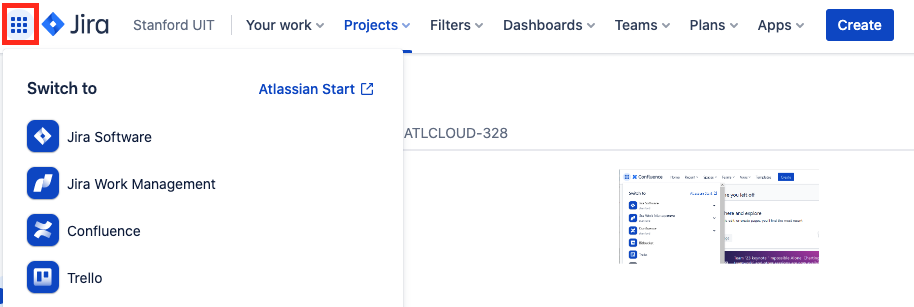
- Q: How can I switch between Jira and Confluence in the cloud?
-
A: Jira and Confluence have an icon with nine squares in the top left-hand corner, allowing you to quickly switch between environments. Click the nine squares icon and select Confluence to switch to Confluence Cloud.
- Q: How do I access my Smartsheet integration?
-
A: Jira Cloud and Smartsheet have been integrated. However, if you already had integrations between a Jira project and SMartsheet, you must recreate those connections using the new Jira Cloud project.
- Q: How do I access my FishEye integration?
-
A: The integration between Jira Cloud and FishEye is still being established. We are hoping to have it set up in the next week or two.
- Q: How do I access my Zephyr integration?
-
A: The integration between Jira Cloud and Zephyr is still being established. We will need to wait until our on-prem Zephyr instance has been moved to the cloud, and then we will work on integrating Jira Cloud with Zephyr Cloud.
Profile
- Q: How do I add my profile picture to Jira Cloud?
-
A: Profile pictures can be uploaded using the instructions linked below. If you use both Jira and Confluence, note that only one profile picture can be used across both applications.
- Q: Why am I not seeing my profile picture in Jira Cloud?
-
A: User profile pictures that were used in the legacy on-prem Jira could not be moved to the Cloud. New profile pictures can be uploaded using the instructions linked below. If you use both Jira and Confluence, note that only one profile picture can be used across both applications.
Issues
- Q:How do I create a new issue?
-
A: Create a new issue by clicking the blue Create button.
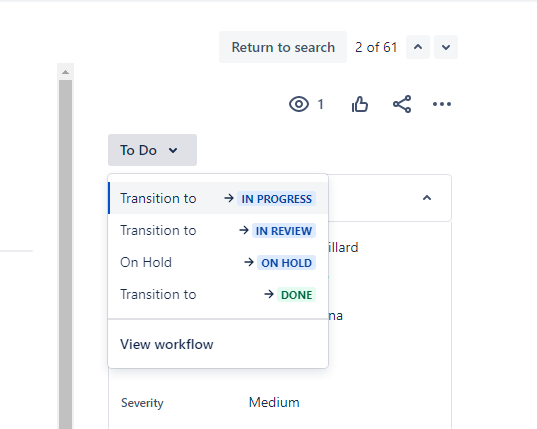
- Q: How do I change the status and workflow transition?
-
A: In Cloud, status and transition are shown in the right sidebar. Workflow transition steps are listed in the status drop-down options, as shown below. The destination status is shown next to the transition name. The View workflow option will be available as the last item in the drop-down list for the transition button.
- Q: Where's the Assign button?
-
A: There is not a similar “Assign” button in the cloud. To assign an issue in the Cloud, simply hover over the Assignee field and change its value inline. Comments can be made in the Add a comment field at the bottom of the issue page or by pressing the letter M on your keyboard.
- Q: Where's the Comment button?
-
A: In the Cloud, the comment feature is now a field (Add a comment) that is automatically visible at the bottom of the Issue page. Tip: Access the comment field quickly by pressing the letter M on your keyboard.
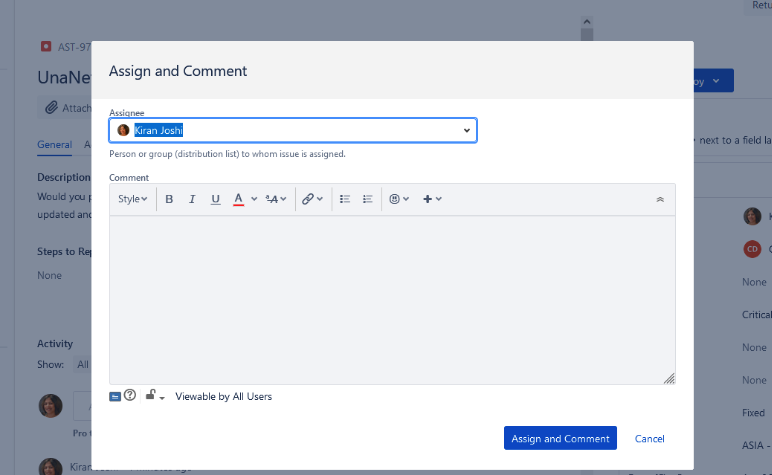
- Q: How do I add a comment while assigning it to another user?
-
A: If you would like to comment on an issue while assigning it to another user, you can do this by clicking the Actions button in the top right corner of an issue. You will then see a drop-down that includes Assign and Comment.
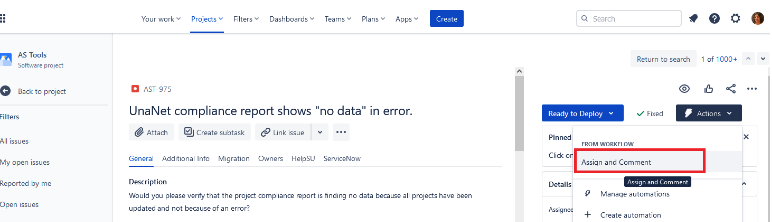
Clicking Assign and Comment will bring up the following window where you can enter a comment while assigning the issue.
- Q: Where's the Edit button?
-
A: There is not a similar “Edit” button in Cloud. To edit a field in the Cloud, simply hover over it and change its value inline.
- Q: How do I attach files and screenshots?
-
A: In the Cloud, you can quickly attach files and screenshots by clicking the Attach button (or paper clip icon) located in the top-center in the Issues view.
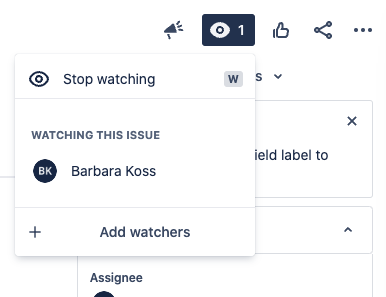
- Q: How do I watch issues or see who is watching?
-
A: When viewing an issue, click the eye icon to view who is watching. To add yourself or others, click Add watchers and type your name or the name of the person you would like to add.
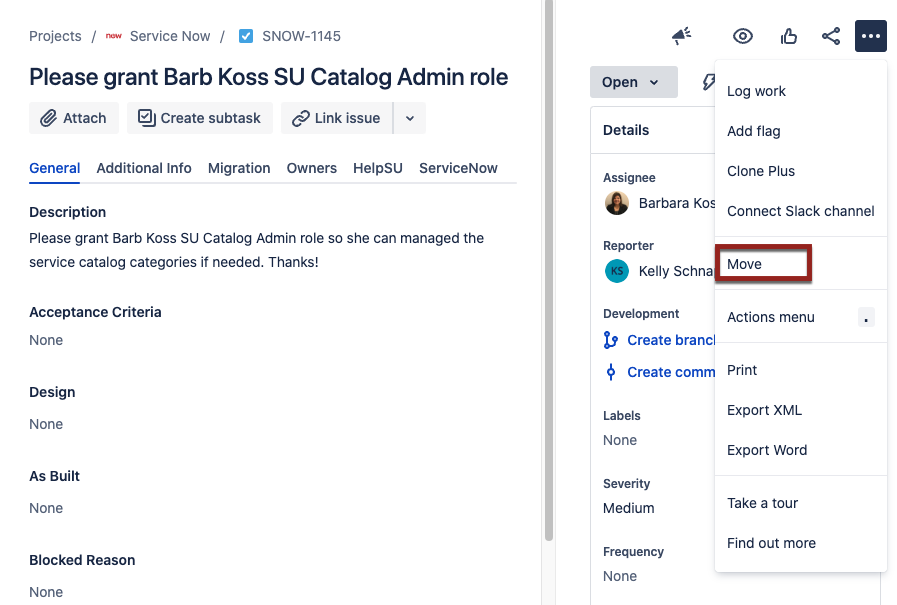
- Q: How do I Clone and/or Move the issue to another project or issue type?
-
A: In Cloud, the “more” button is now an Actions icon that is represented as three dots. Click the three dots in the upper right corner to expand more options.
- To clone an issue, select Clone Plus from the drop-down menu. This feature allows you to add and modify content while cloning and gives you the option to "move" it to a different project or task type at the same time.
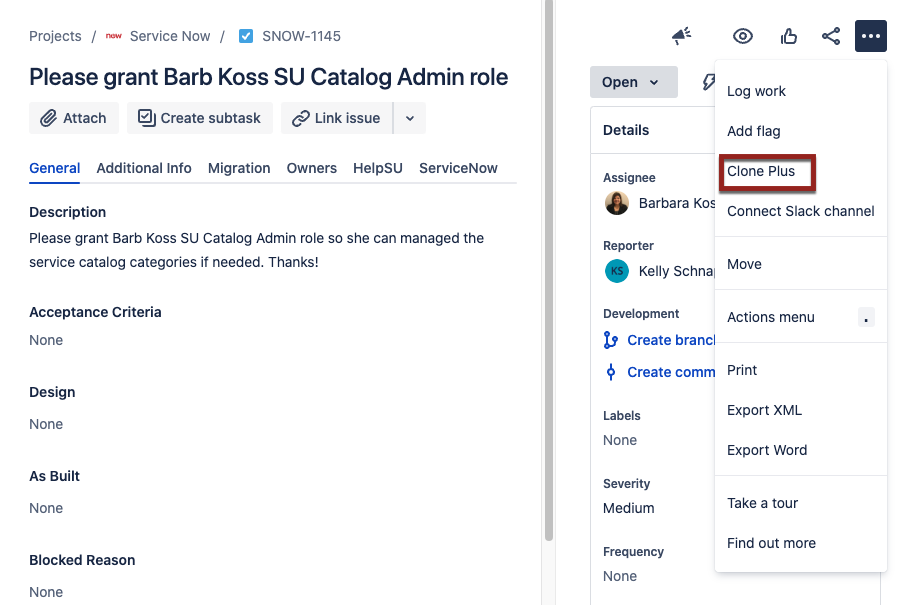
- To change the project or issue type, without cloning, choose Move from the drop-down menu.
- To clone an issue, select Clone Plus from the drop-down menu. This feature allows you to add and modify content while cloning and gives you the option to "move" it to a different project or task type at the same time.
- Q: How do I create a sub-task or convert to a sub-task?
-
A: In the Cloud, you can quickly create a subtask and screenshots by clicking the Create subtask button (or checked box icon) located in the top-center in the Issues view.
To convert to Subtask, you will need to click the Actions icon (three dots) in the upper right corner and select Covert to Subtask from the drop-down options. - Q: How do I edit the Issue’s labels?
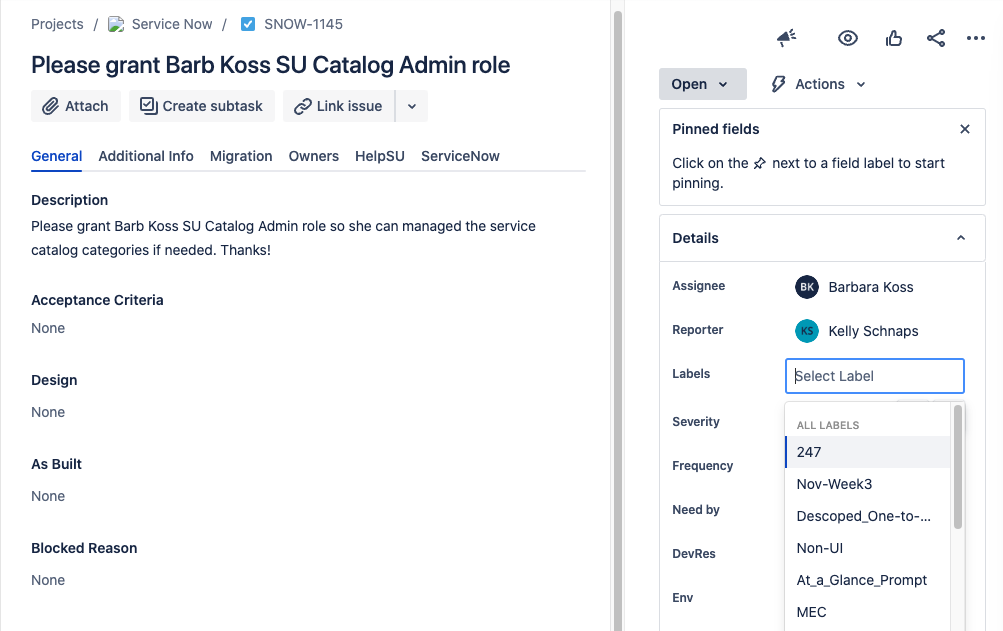
-
A: In the cloud, fields can be edited directly in line. To edit an Issue’s label, locate the Labels field, click in the space to the right of it, and select a new label.
- Q: How do I preview an Issue?
-
A: In the Cloud, a full-view pop-up screen replaces the limited view right-hand pane. Click on any Jira ticket within a sprint board to view the full Jira issue in a pop-up screen. You will still need to click the ticket number and open in a new tab to see the full page view of the Jira ticket.
- Q: How do I see the Issue type?
-
A: In the Cloud, simply hover on the ticket number and there will be an Issue type image which can be seen on all Jira tickets.
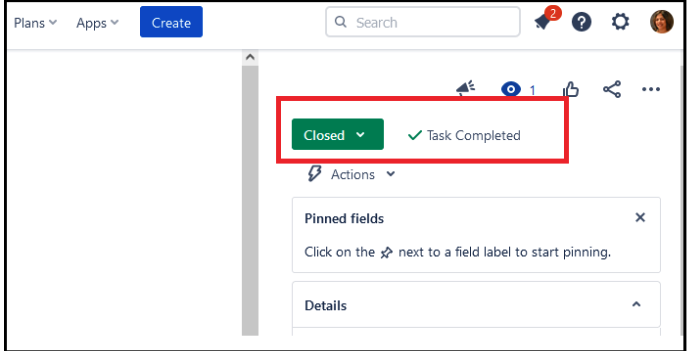
- Q: Where is the Status and Resolution field?
-
A: The status field now appears at the top of the right-hand sidebar. The status will appear as a square button that provides a drop-down list to change the status. If the resolution field on a ticket is populated, the resolution will appear to the left of the status.
- Q: How can I create an issue in a new tab?
-
A: In the Cloud, Create issue cannot be opened in a new tab at this time. As a workaround, you can use the direct link Create issue (for UAT) or Create issue (for Production) to create issues in a single tab.
- Q: Why can’t I search for usernames in the advanced issue filter?
-
A: As a result of GDPR (General Data Protection Regulation) compliance changes, JQL cannot use user names. Atlassian has changed all Cloud APIs to identify users anonymously rather than by username in order to better protect the individual right to privacy. See Gdpr-changes-to-usernames-in-jira-cloud and Convert-usernames-to-account-ids/#Converting-JQL for additional information.
As a workaround, you can type the whole email address of the user without using the autocomplete feature/choosing the value from the dropdown options. Alternatively, you can run the JQL query using the account IDs and then click on “Switch to basic,” which will display the usernames. Please note this won’t work if the JQL query is too complex. - Q: How do I filter by severity in the Cloud?
-
A: If you already have a filter for the severity field setup in the legacy Jira, you will need to update the filter conditions. In Jira cloud, you need to use the "Severity[Dropdown]" instead of "Severity" and then save the filter. The new field name will autocomplete when you start editing it. After doing this, you should see the results you expect.
Projects
- Q: How do I find my projects?
-
A: Click the Projects drop-down at the top of the page. In Cloud, you can search the project list using the text box and drop-down menus at the top. In the list table, there’s a column for favorite projects (star), project types are shown in words, and the lead’s avatar icon is displayed. The associated URL shows as a link icon.
What's new
- Q: What are the latest cloud features?
-
A: The latest Jira updates and features can be found in our digest of Stanford's JIra and Confluence release notes. For a list of all the weekly releases, you can visit the Atlassian blog.
Below are some features that are currently available in the Cloud:- The your work page displays a list of issues assigned to you, your recent or favorite issues, filters, boards, and dashboards.
- Copy the comment link from a Jira issue.
- Action buttons at the top of the page display only the icons for small screens. For example, the create button changes to a "+" sign for small screens when creating new issues.
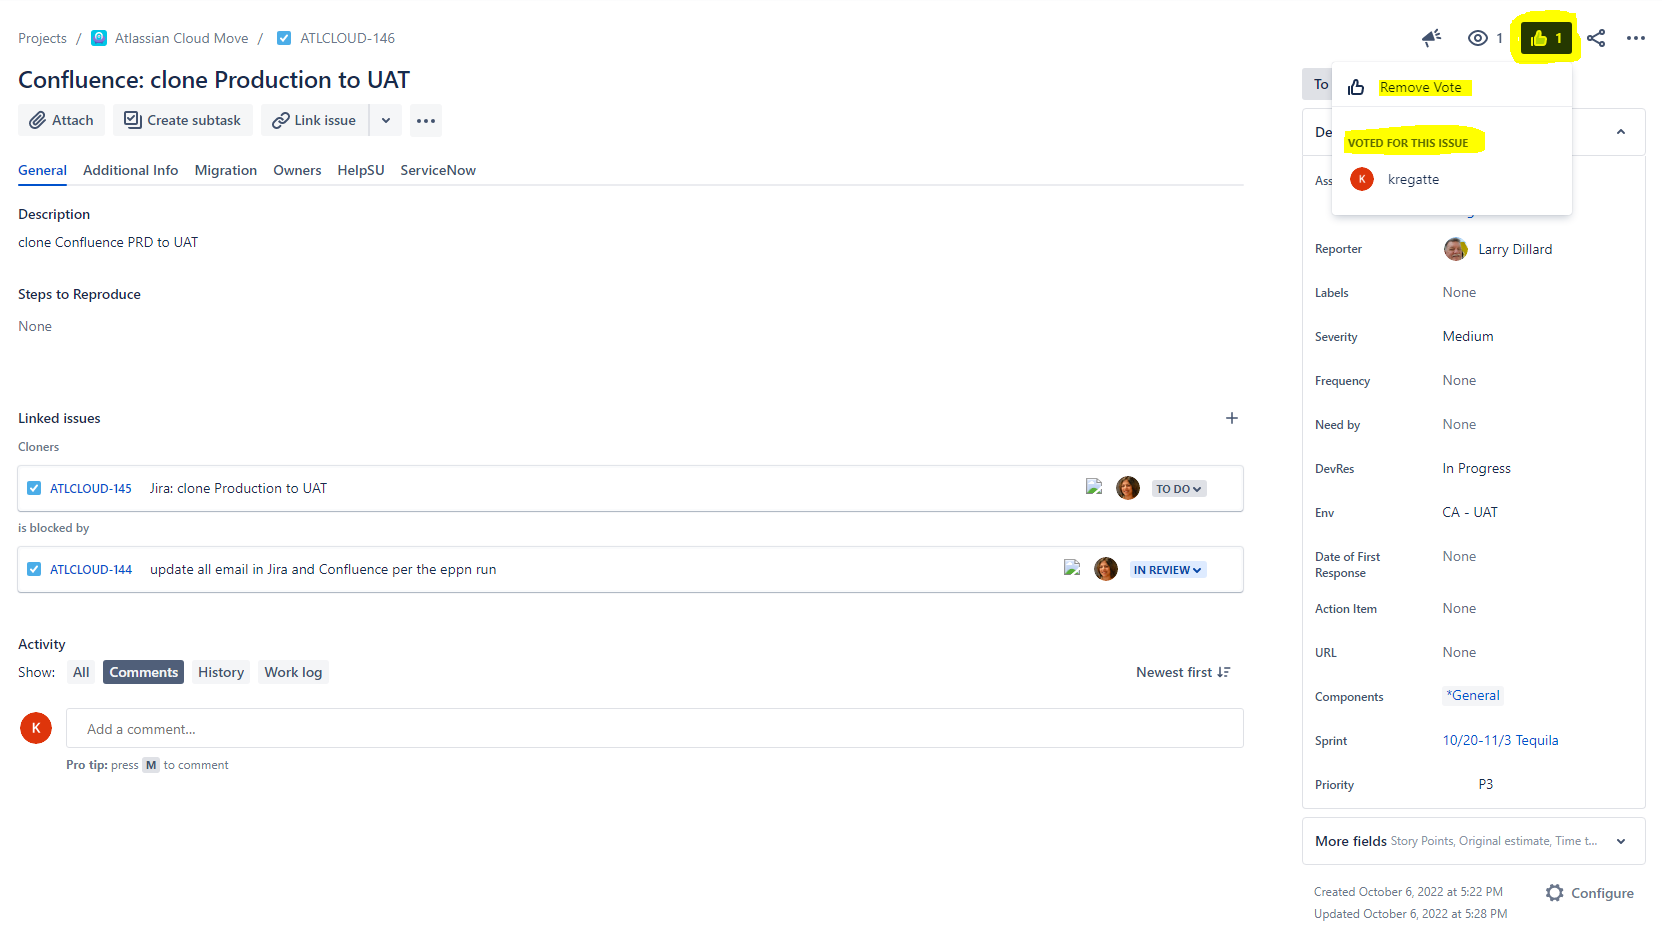
- Vote on any issue by clicking the thumbs-up icon in the upper-right-hand corner. This feature is only available in the Cloud.
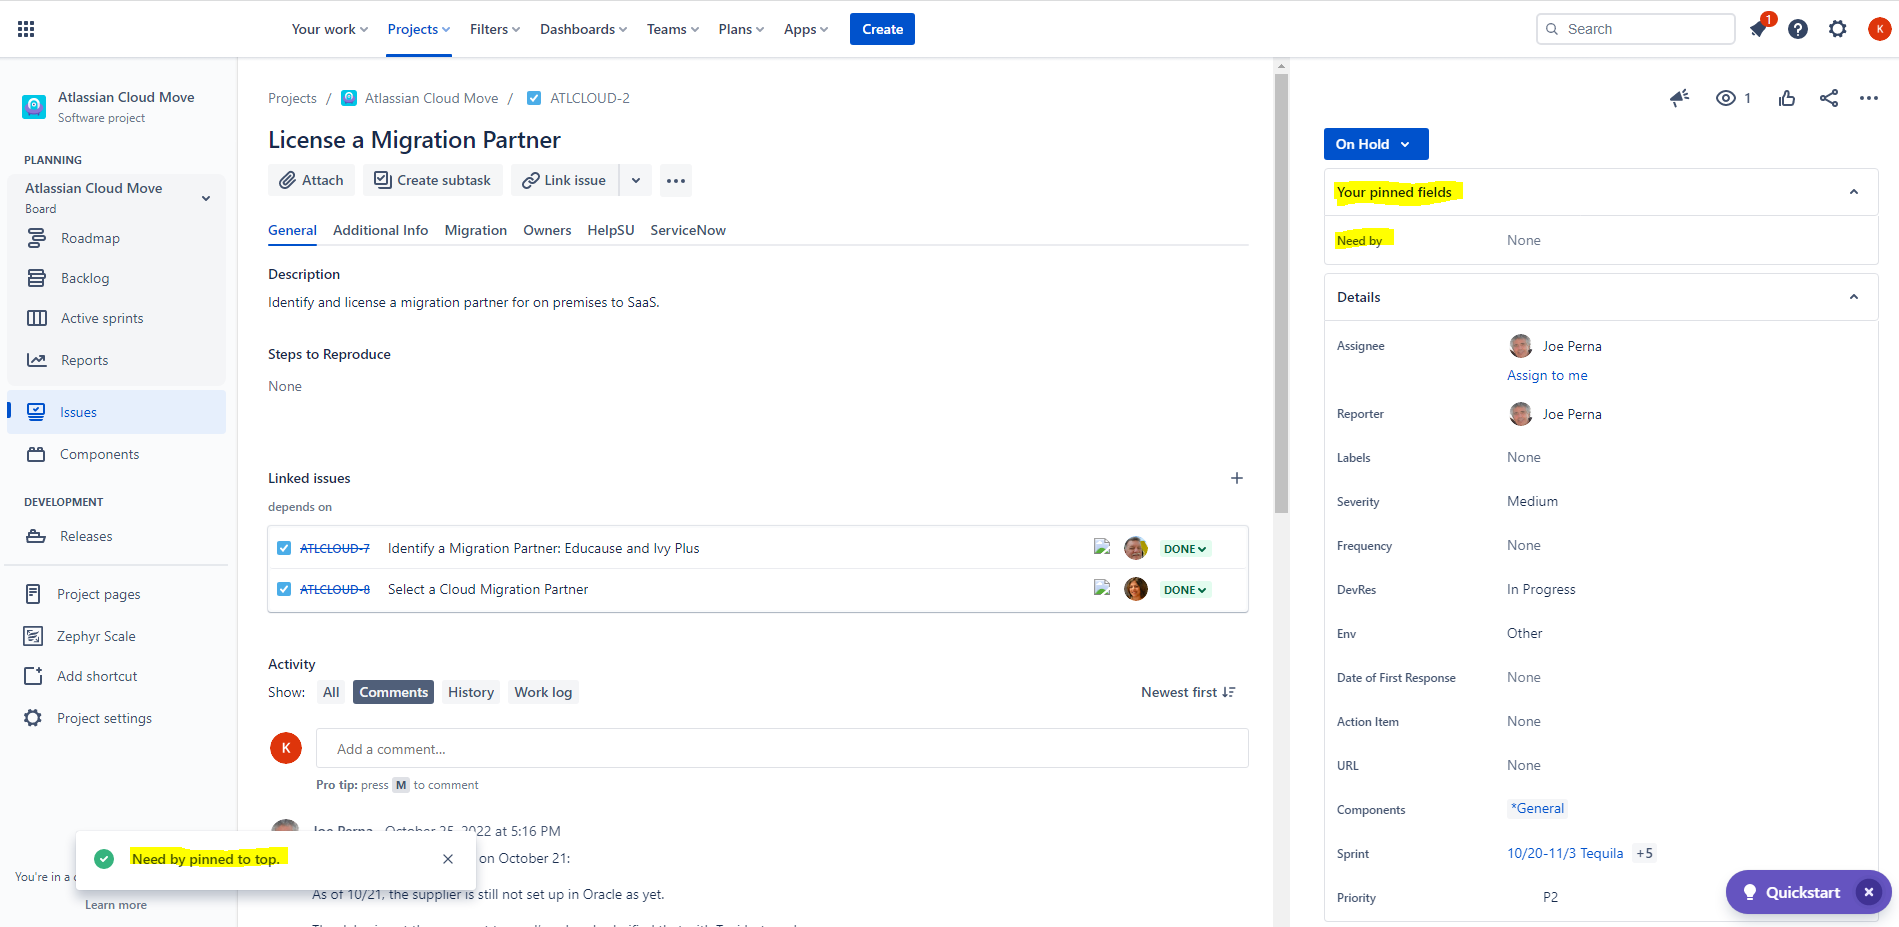
- Some fields in a Jira ticket can now be pinned.
Get help
If you still have questions about Jira Cloud, submit a Help request.