Customer Guide for joining AWS Transit Gateway
This document covers the steps on how to join IT Infrastructure (ITI) AWS Transit Gateway (TGW), which allows connectivity back to the Stanford University campus.
This document assumes that VPC and subnet(s) have been created using the CIDR range assigned by ITI. If you do not know how to create a VPC and subnet(s), please let the assigned ITI engineer know.
If you don’t have an Amazon Web Services (AWS) account, you can request a new account.
Step 1: Provide your account ID
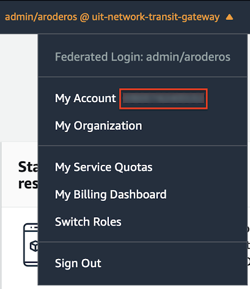
An IT Infrastructure engineer will need your account ID, so they can invite your account to connect to the AWS Transit Gateway. To find your account ID, log into the AWS management console and look at the top right corner.
Step 2: Accept the invitation
Once the IT Infrastructure engineer has sent the invite, you will need to accept it.
- Log into the AWS management console.
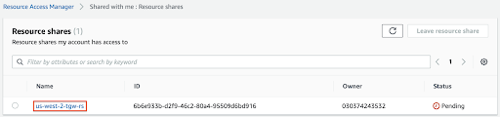
- In the search field, type Resource Access Manager and select it.

- On the left navigation pane of the Resource Access Manager, under the Shared with me section that there's a 1 invitation pending next to the Resource shares. Click the Resource shares link.

- Click the us-west-2-tgw-rs link.
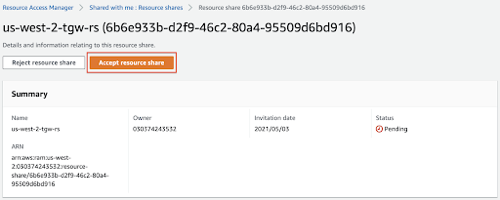
- Click the Accept resource share button.
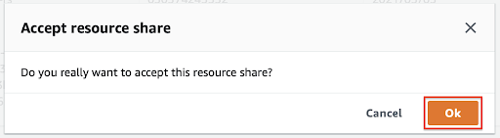
- Click the Ok button.
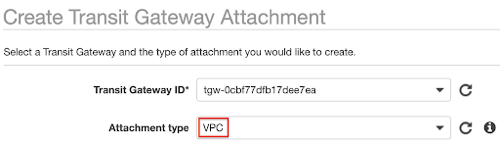
Step 3: Create a Transit Gateway attachment
Before you can use the ITI's TGW, you will need to create an attachment.
- Log into the AWS management console.
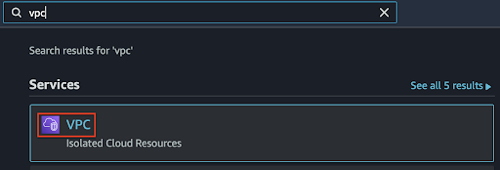
- In the search field, type VPC and select it.
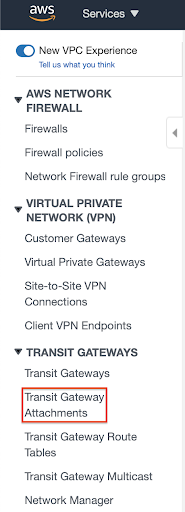
- On the left navigation page, scroll down to the Transit Gateway section and select Transit Gateway Attachments.
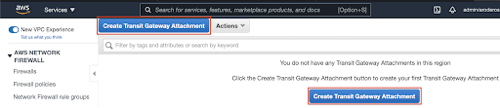
- Click the Create Transit Gateway Attachment button.
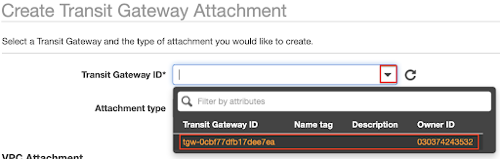
- In the Transit Gateway ID drop-down menu, select tgw-0cbf77dfb17dee7ea.
- In the Attachment type drop-down menu, the VPC should be selected by default.
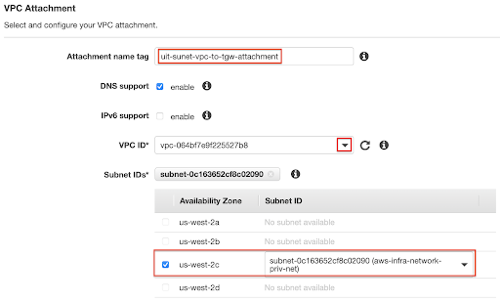
- In the Attachment name tag field, enter the desired name.
- In the VPC ID drop-down menu, select the VPC that you want to connect to the TGW.
Note: Adding an existing VPC with resources deployed may cause outage to existing TGW customers, so please check with the assigned ITI engineer before attaching the TGW to your VPC. A new VPC may be necessary depending on your current environment. - In the Subnet IDs section, all subnets should be selected. Uncheck subnets you don't want to communicate back to the SU campus.
- Click the Create attachment button.
- Click the Close button.
- Wait until the state changes from Pending to Available.
Step 4: Edit route table
When you create a VPC and subnet that is SU-compliant, by default, AWS creates a default route table associated with the VPC and subnet.
- Log into the AWS management console.
- In the search field, type VPC and select it.
- On the left navigation page, look for the Route Tables and select it.
- On the Route Tables page, look for the VPC that you want to connect to ITI's TGW and select it.
- Optional: Rename the route table to something that is descriptive.
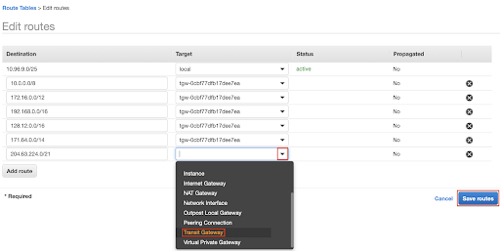
- Once the correct route table has been selected, click the Actions drop-down menu and select Edit routes.

- Click the Add route button six times.
- Add the following prefixes in the Destination column:
- 10.0.0.0/8
- 172.16.0.0/12
- 192.168.0.0/16
- 128.12.0.0/16
- 171.64.0.0/14
- 204.63.224.0/21
- In the Target column, click the drop-down arrow and select Transit Gateway.
- Click the Save routes button.
- Click the Close button.
Note: You may need more routes depending on your use case. If you encounter an issue, please work with the ITI engineer assigned to your ticket.
Step 5: Verify connectivity
You must have a running EC2 instance and properly configured security groups before proceeding with the next step.
There are two ways of verifying that the connectivity between your VPC and campus.
- Option 1: From your EC2 instance, ping a host (or more) with a private IP address that is on campus. If you can't think of one, please ping 10.98.1.26.
Note: Do not attempt to ping with the FQDN address unless you pointed the host to SU DNS servers.
- Option 2: From your host, ping the private IP address of your EC2 instance.
Let the ITI engineer assigned to your ticket when everything is good to go or if you encounter any issues.
Important Information
If you no longer need to connect your VPC to ITI's Transit Gateway, please open a ticket or contact the assigned engineer that you worked with originally.